
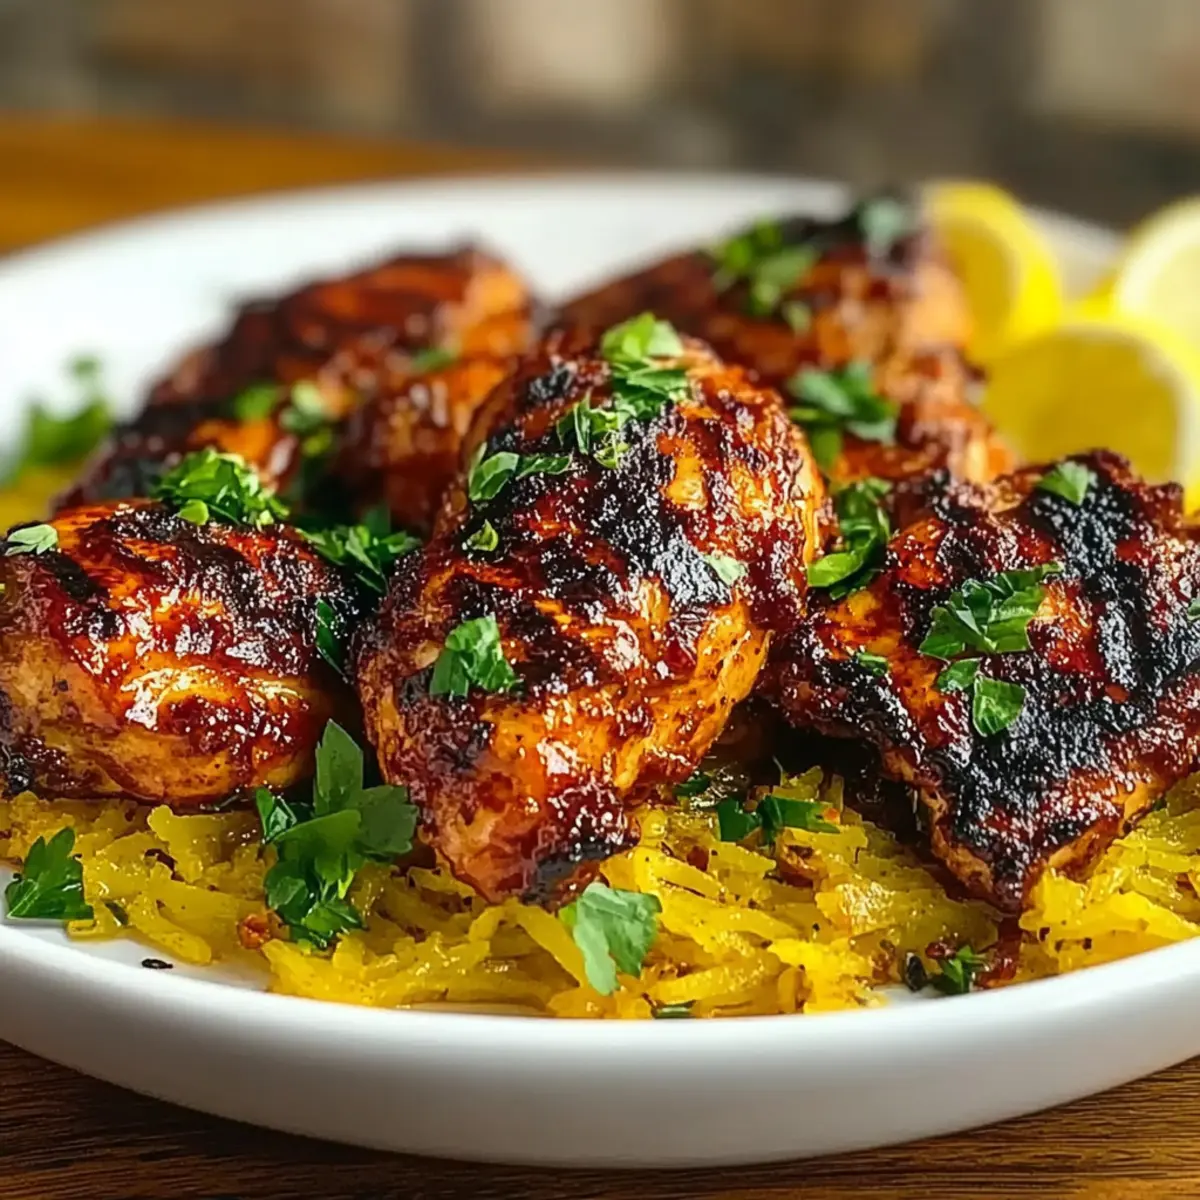
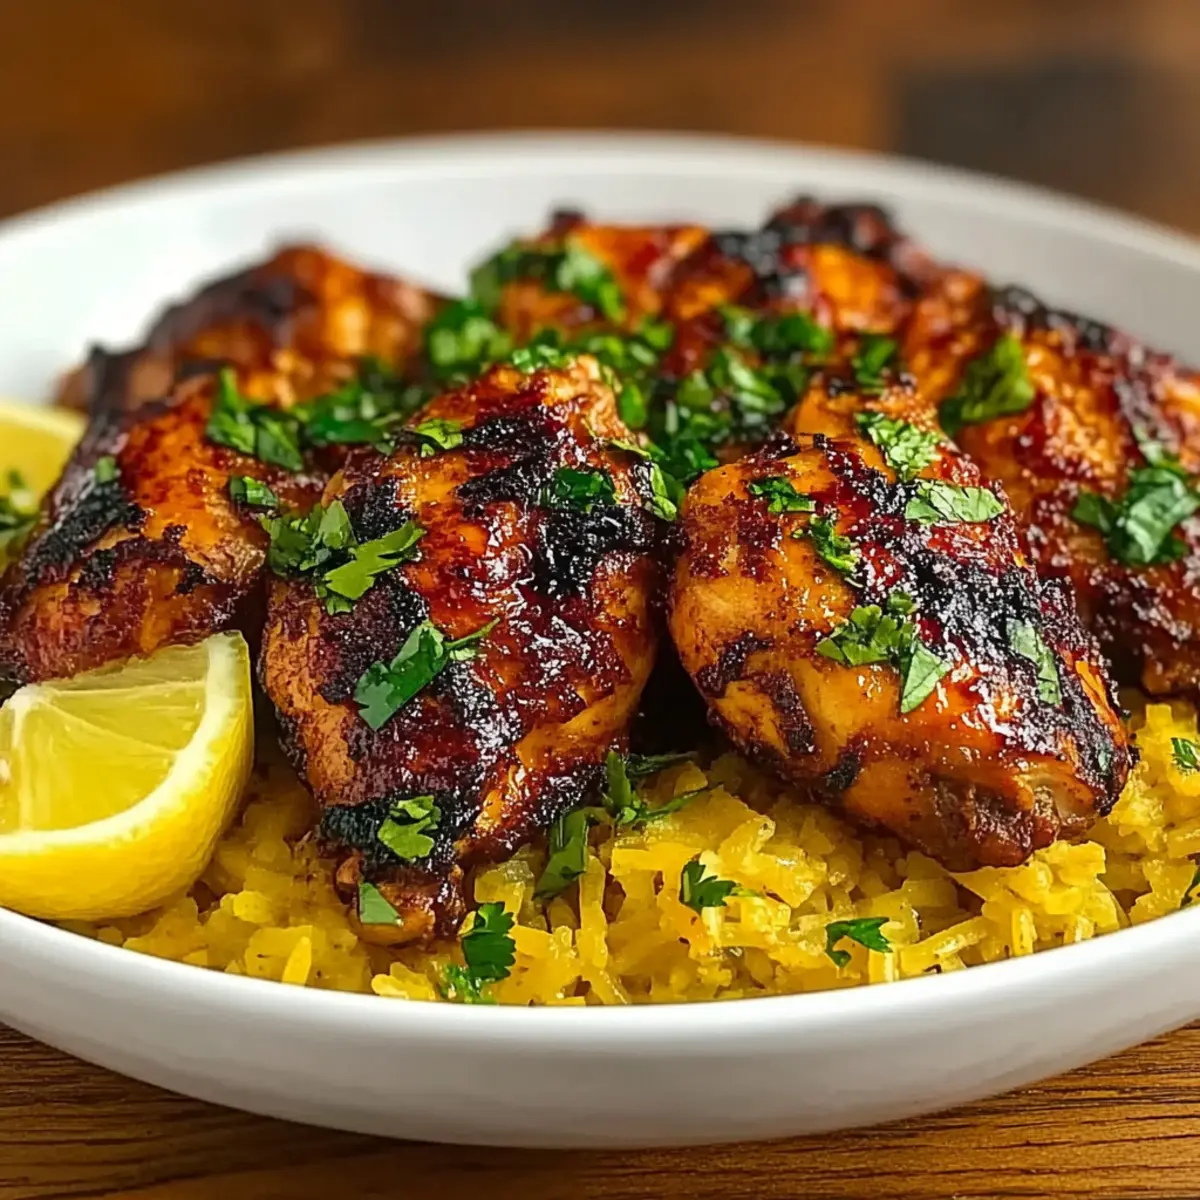
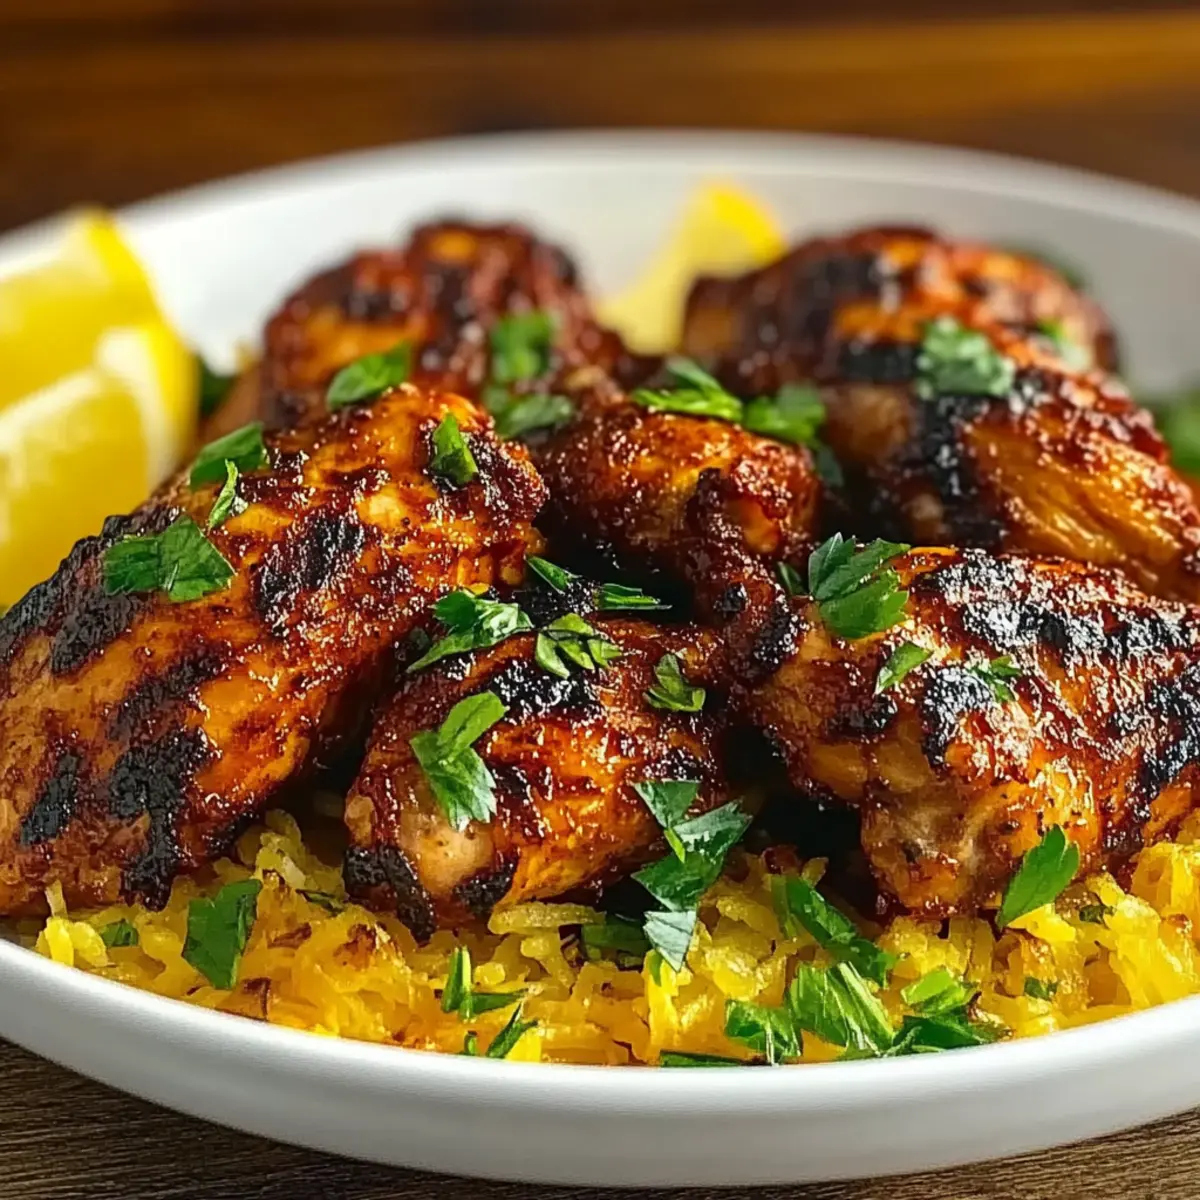
As I stood by the grill, the tantalizing scent of spices wafted through the air, instantly transporting me to the vibrant streets of Portugal. This Spicy Peri Peri Chicken recipe is not just a meal; it’s a flavor adventure that beckons the adventurous foodie in all of us. With its fiery marinade and juicy chicken, this dish is not only bursting with personality but also incredibly versatile, perfect for both casual weeknight dinners and lively gatherings. You can grill, roast, or even pan-sear it, making mealtime a breeze no matter your cooking style. Better yet, it’s easily adaptable—you can swap chicken for tofu or cauliflower, ensuring that everyone can enjoy a bite of this delightful dish. Curious how to master this crowd-pleaser? Let’s dive into the magic of Peri Peri Chicken!
Why is Peri Peri Chicken a Must-Try?
Bold Flavors: The spicy marinade brings a fiery kick that enlivens your taste buds, making every bite a celebration of zest.
Versatile Cooking Options: Whether you prefer grilling, roasting, or pan-searing, this recipe adapts beautifully to your cooking style.
Easy Ingredient Swaps: Not feeling chicken? No problem! Tofu or cauliflower can step in for a satisfying vegetarian alternative.
Perfect for Gathering: Serve it at parties or intimate dinners, and you’ll surely impress with a dish that’s both delicious and visually stunning.
Quick Prep Time: With just a little marinating time, this recipe is a time-saver perfect for busy weeknights, leaving you more time to relax and enjoy.
Serve with Flair: Pair with fluffy rice or a zesty salsa for a meal that is as great to look at as it is to eat!
Peri Peri Chicken Ingredients
For the Chicken
• Whole Chicken (cut into pieces) – Main protein source; ensure even cooking by cutting into uniform sizes.
• Olive Oil (1/4 cup) – Adds moisture and richness; can substitute with vegetable oil for a lighter flavor.
For the Marinade
• Garlic (4 cloves, minced) – Provides aromatic depth; fresh garlic is recommended for the best flavor.
• Lemons (2, juiced) – Adds acidity to brighten flavors; can use vinegar as a substitute if lemons are unavailable.
• Paprika (2 tablespoons) – Contributes to color and a mild sweetness; smoked paprika can enhance depth of flavor.
• Dried Oregano (1 tablespoon) – Adds herbaceous tang; thyme can be a suitable replacement.
• Chili Flakes (1 tablespoon) – Infuses heat; adjust quantity based on spice preference for your Peri Peri Chicken.
• Salt and Pepper (to taste) – Enhances flavor balance; use sea salt for a more intense flavor profile.
Step‑by‑Step Instructions for Spicy Peri Peri Chicken
Step 1: Prepare Marinade
In a large mixing bowl, combine 1/4 cup of olive oil, 4 minced garlic cloves, the juice of 2 lemons, 2 tablespoons of paprika, 1 tablespoon of dried oregano, and 1 tablespoon of chili flakes. Season with salt and pepper to taste. Whisk until the mixture is well combined and the ingredients are fully integrated, creating a vivid marinade that screams flavor.
Step 2: Marinate Chicken
Place the cut pieces of your whole chicken into a resealable plastic bag or large bowl for marinating. Pour the prepared Peri Peri marinade over the chicken, ensuring each piece is well-coated. Seal the bag, squeezing out excess air, or cover the bowl tightly, then refrigerate for at least 2 hours, but preferably overnight to let those flavors deeply absorb.
Step 3: Preheat Cooking Equipment
When you’re ready to cook, preheat your grill or oven to medium-high heat, around 400°F (200°C). If using a grill, ensure the grates are clean and lightly oiled to prevent sticking. For oven roasting, prepare a baking sheet lined with parchment paper or a roasting pan to catch any drippings and enhance cleanup.
Step 4: Cook Chicken
Once your grill or oven is preheated, remove the chicken from the marinade. If grilling, place the chicken pieces skin-side down on the hot grill. Cook for about 25-30 minutes, turning occasionally, until the chicken is fully cooked, charred, and has internal temperatures of 165°F (75°C). For roasting, arrange pieces on the prepared pan and roast until golden and cooked through.
Step 5: Rest and Serve
After cooking, let the Peri Peri Chicken rest for 5-10 minutes, allowing the juices to redistribute for tenderness. During this time, you can prepare any garnishes like fresh herbs or lemon wedges. Serve the chicken warm, with sides like fluffy rice or grilled vegetables to complement its spiciness, creating a delightful meal experience.

Peri Peri Chicken Variations & Substitutions
Customize your Peri Peri Chicken experience with these fun and tasty ideas that will spice things up for everyone at your table!
-
Vegetarian Swap: Replace chicken with tofu or cauliflower for a delightful vegetarian feast packed with the same zesty flavors.
-
Heat Level Adjustments: For a milder version, reduce the amount of chili flakes or serve with a side of cooling tzatziki sauce.
-
Different Proteins: Experiment with boneless chicken thighs or even fish such as salmon for a unique twist that adds rich flavors.
-
Different Oils: Swap out olive oil for coconut oil to introduce a subtle tropical richness that beautifully complements the spices.
-
Herb Variations: Add fresh herbs like cilantro or parsley to the marinade for a burst of freshness that brightens each bite.
-
Citrus Zing: Try substituting lemon with lime juice for a different kind of acidity and a refreshing twist on traditional flavors.
-
Grill Marks Galore: If you love smoky flavors, toss in some smoked paprika instead of regular to elevate the rustic quality of your Peri Peri Chicken.
-
Sweetness Hint: A drizzle of honey can be added to the marinade for a sweet contrast to the spice that harmonizes perfectly with the heat.
Try these variations and serve your Peri Peri Chicken alongside a side of Garlic Chicken Broccoli or some delicious Bang Bang Chicken to take your meal to the next level!
Expert Tips for Peri Peri Chicken
- Marinade Time: Longer marination (overnight is best) lets flavors infuse deeply, ensuring your Peri Peri Chicken is bursting with taste.
- Flavor Boost: Piercing chicken pieces before marinating allows more flavor to penetrate; don’t skip this step!
- Basting Magic: Baste the chicken with leftover marinade while cooking to maintain moisture and enhance the marinade’s richness.
- Use a Thermometer: Always check for doneness with a meat thermometer; 165°F ensures perfectly cooked chicken without dryness.
- Resting Stage: Taking a few minutes to rest the chicken post-cooking redistributes juices for succulent, juicy bites you’ll love.
- Experiment with Spices: Feel free to adjust chili flakes for your heat preference or add herbs like cumin for a twist on your Peri Peri Chicken!
What to Serve with Spicy Peri Peri Chicken
Elevate your meal with delightful side dishes that complement the bold flavors of this fiery chicken masterpiece.
- Fluffy Rice: A perfect base to soak up the zesty juices, fluffy rice balances the heat with its comforting texture. Pair with a squeeze of lemon for an extra zing.
- Fresh Tzatziki: This cool and creamy yogurt sauce offers a refreshing contrast, soothing the palate after every spicy bite of chicken. Serve it on the side for an irresistible dipping option.
- Grilled Vegetables: Charred bell peppers, zucchini, and asparagus add vibrant colors and smoky flavor, enhancing the grilling experience that unites beautifully with the chicken.
- Couscous Salad: Light yet filling, a couscous salad with herbs, tomatoes, and a hint of lemon mirrors the fresh elements in your chicken dish. It’s a great way to add more nutrients to your meal.
- Warm Pita Bread: Soft, warm pita pockets are not only great for scooping but also offer a fun way to enjoy leftovers. Fill with Peri Peri Chicken and veggies for a delicious wrap!
- Chilled White Wine: A crisp, refreshing white wine pairs exceptionally well, balancing the spicy notes of the chicken while making any gathering feel special and celebratory.
- Fruit Salad: A light, vibrant fruit salad featuring mango and pineapple provides a sweet contrast to the spicy kick, refreshing and revitalizing your taste buds.
- Classic Caesar Salad: The creamy dressing and crunchy croutons add a delightful texture while offering a slight tanginess that complements the chicken’s flavors seamlessly.
- Chocolate Mousse: For dessert, indulge in a rich chocolate mousse to cap off your meal. Its creamy sweetness makes for an elegant finish after the zesty Peri Peri experience.
Make Ahead Options
These Spicy Peri Peri Chicken pieces are perfect for busy weeknights and meal prep enthusiasts! You can marinate the chicken up to 24 hours in advance, allowing the flavors to intensify. Simply prepare the marinade as directed, coat the chicken pieces, and refrigerate them in a sealed bag or container overnight. If you’re planning to serve the chicken later in the week, you can also marinate and freeze it for up to 3 months; just be sure to thaw it in the refrigerator the night before cooking. When you’re ready to grill or roast, remove the chicken from the marinade and cook as instructed for a delicious, stress-free meal that’s just as vibrant and flavorful!
How to Store and Freeze Peri Peri Chicken
Fridge: Store leftovers in an airtight container for up to 3 days. Reheat in the oven or skillet for the best flavor and texture.
Freezer: For longer storage, freeze marinated or cooked Peri Peri Chicken in airtight containers for up to 3 months. Thaw in the fridge before reheating.
Reheating: When reheating, ensure the chicken reaches an internal temperature of 165°F (75°C) for safety and optimal taste. Enjoy your flavorful Peri Peri Chicken again!
Peri Peri Chicken Recipe FAQs
What should I look for when selecting chicken for the Peri Peri Chicken recipe?
Absolutely! Choose a whole chicken that has a vibrant color and is firm to the touch. Look for pieces that are plump without dark spots or any signs of discoloration. If you’re opting for bone-in pieces, try to ensure the skin is intact to help keep the meat juicy during cooking.
How should I store leftover Peri Peri Chicken?
To keep your leftover Peri Peri Chicken fresh, place it in an airtight container in the refrigerator. It will remain delicious for up to 3 days. I often reheat mine in the oven to maintain its crispy skin, which takes around 15-20 minutes at 350°F (175°C).
Can I freeze the Peri Peri Chicken, and if so, how?
Yes, you can freeze Peri Peri Chicken! To do this, let it cool completely first. Then, place the chicken in airtight containers or heavy-duty freezer bags, trying to remove as much air as possible. It can be frozen for up to 3 months. When you’re ready to enjoy it again, thaw it in the refrigerator overnight before reheating to keep it juicy and flavorful.
What should I do if the chicken is cooking unevenly?
If you find that your Peri Peri Chicken is cooking unevenly, it could be that some pieces are thicker than others. To remedy this, you can flip the chicken pieces halfway through cooking and also adjust their positions on the grill or pan. Using a meat thermometer can help, too; aim for an internal temperature of 165°F (75°C) for perfectly cooked, juicy meat throughout.
Are there any dietary considerations I should keep in mind while cooking this dish?
Very! If you’re cooking for a diverse crowd, be sure to check for any allergies, especially to garlic or spicy ingredients. For a gluten-free option, ensure all your ingredients, including any side dishes, are certified gluten-free. If you’re catering to vegetarians, feel free to swap the chicken for tofu or cauliflower, which will absorb the delicious marinade beautifully, although the cooking times may vary slightly.
Zesty Peri Peri Chicken for Unforgettable Meal Moments
Ingredients
Equipment
Method
- In a large mixing bowl, combine 1/4 cup of olive oil, 4 minced garlic cloves, the juice of 2 lemons, 2 tablespoons of paprika, 1 tablespoon of dried oregano, and 1 tablespoon of chili flakes. Season with salt and pepper to taste. Whisk until the mixture is well combined.
- Place the cut pieces of your whole chicken into a resealable plastic bag or large bowl for marinating. Pour the prepared Peri Peri marinade over the chicken, ensuring each piece is well-coated. Seal the bag, squeezing out excess air, or cover the bowl tightly, then refrigerate for at least 2 hours, but preferably overnight.
- When you're ready to cook, preheat your grill or oven to medium-high heat, around 400°F (200°C).
- Once your grill or oven is preheated, remove the chicken from the marinade. If grilling, place the chicken pieces skin-side down on the hot grill. Cook for about 25-30 minutes, turning occasionally, until the chicken is fully cooked, charred, and has internal temperatures of 165°F (75°C). For roasting, arrange pieces on a prepared pan and roast until golden and cooked through.
- After cooking, let the Peri Peri Chicken rest for 5-10 minutes, then serve warm with sides like fluffy rice or grilled vegetables.