
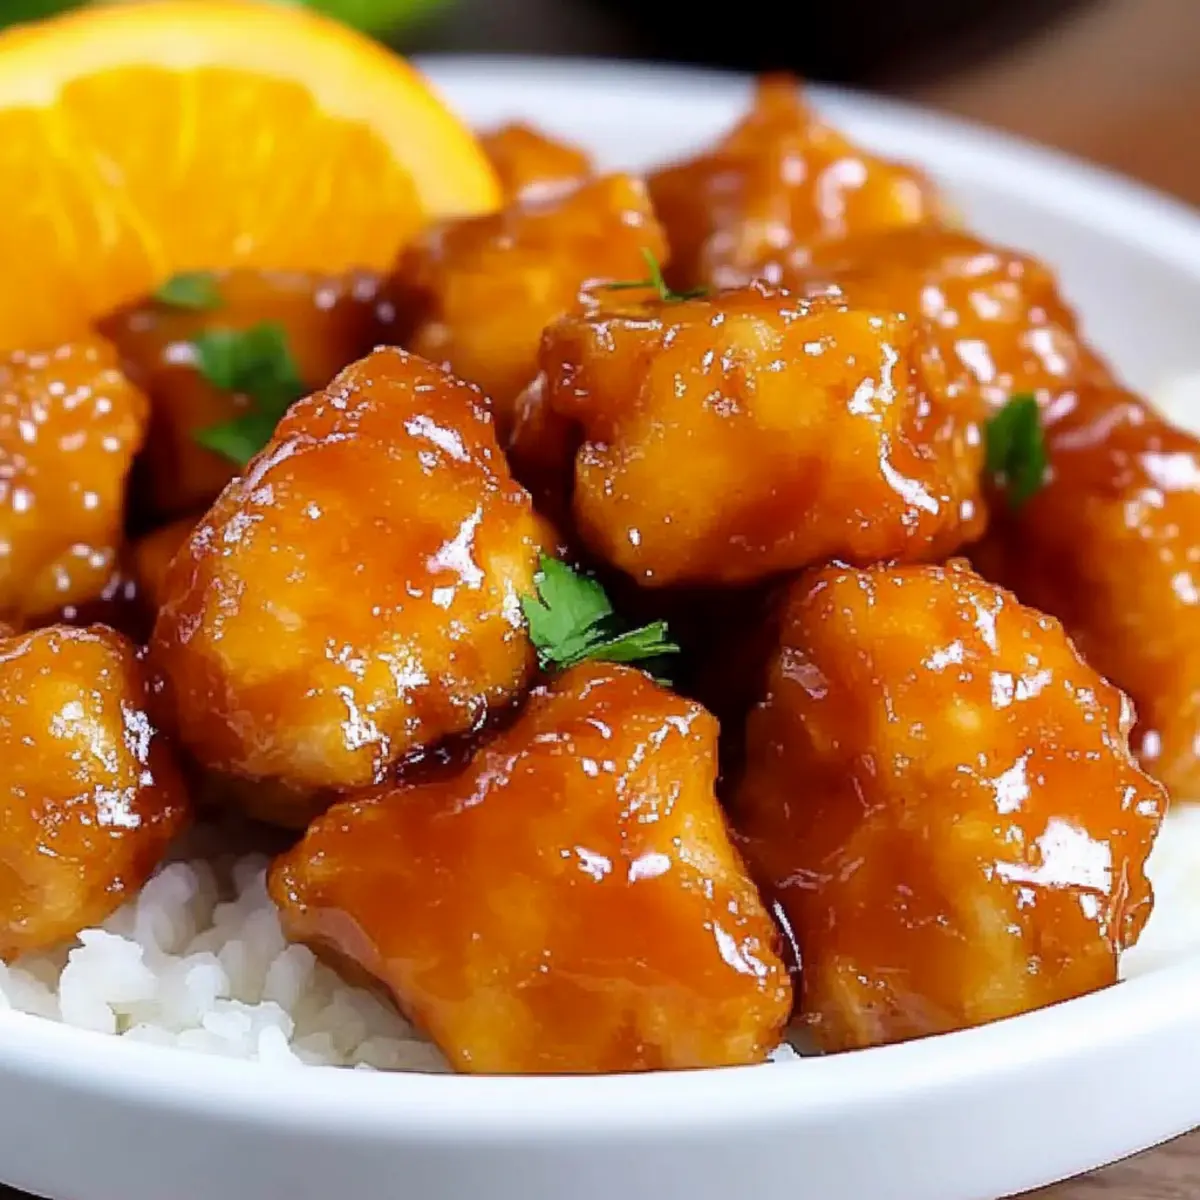
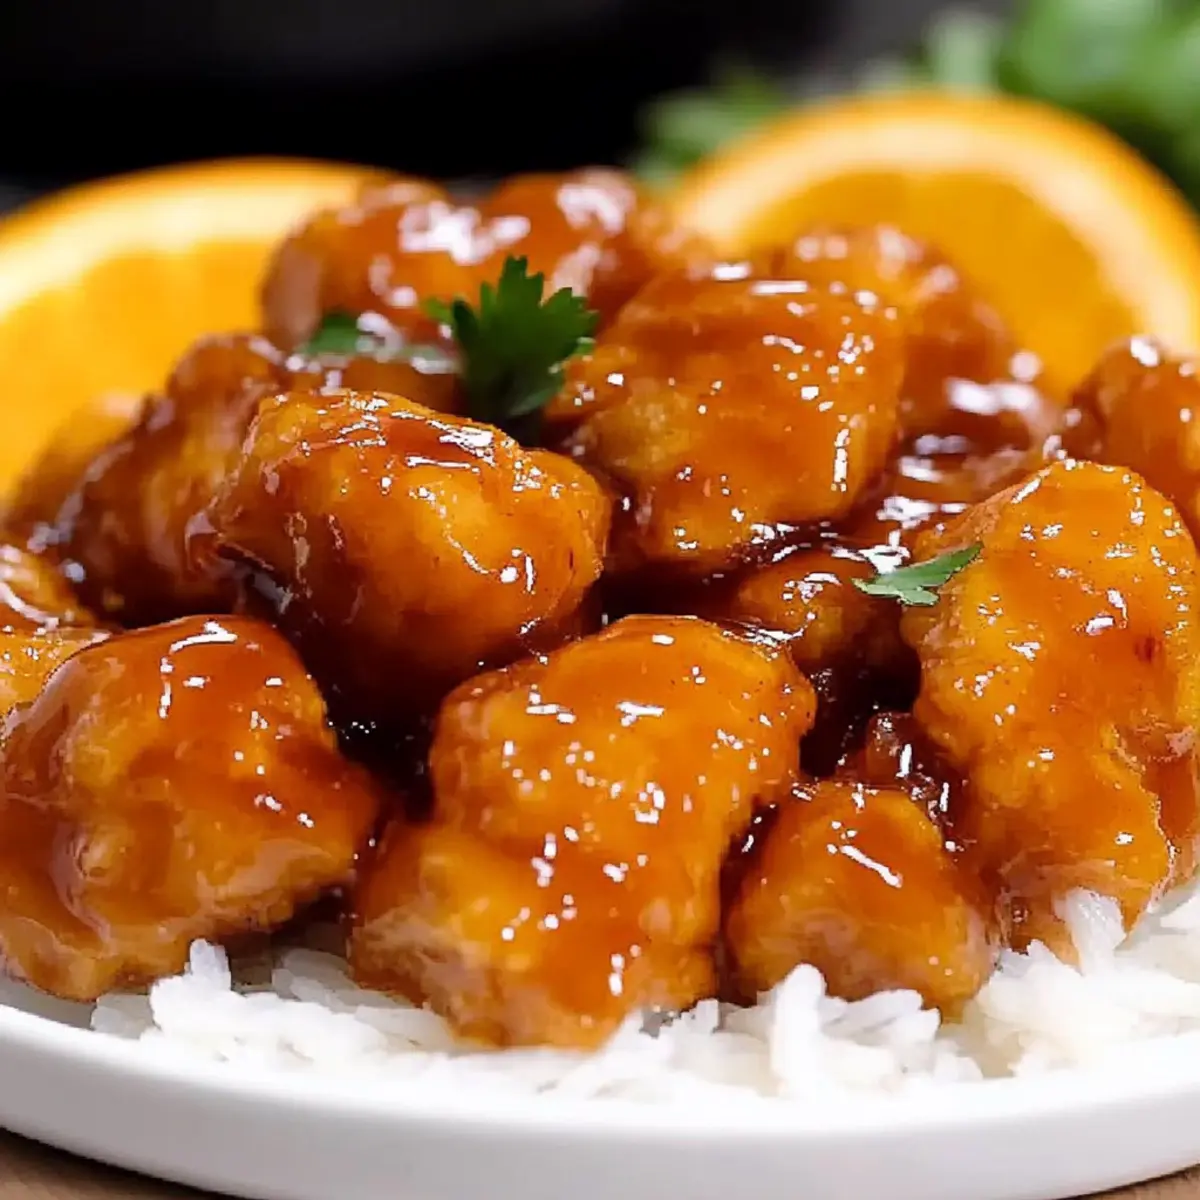
As I stood in my kitchen, the scent of citrus mingling with savory spices wafted through the air, instantly transporting me to my favorite Asian restaurant. That’s the magic of homemade Sticky and Crispy Orange Chicken. Unlike takeout, this dish offers a delightful balance of crispy chicken enveloped in a tangy, glossy sauce—all from your own kitchen. Not only is it a breeze to whip up on a busy weeknight, but it’s also a reliable crowd-pleaser that will leave everyone asking for seconds. With its irresistible texture and zesty flavor, you’ll wonder why you ever settled for fast food. Ready to elevate your homemade dinner game? Let’s dive into the deliciousness together!
Why Is This Orange Chicken Unforgettable?
Irresistible Crunch: The crispy exterior combined with tender chicken inside makes every bite a delightful experience.
Flavor Explosion: Each piece is coated in a tangy, sweet glaze that perfectly balances savory and citrus flavors, elevating your meal beyond takeout.
Quick & Easy: With simple ingredients and instructions, dinner is ready in no time—perfect for busy evenings when you crave comfort food.
Crowd-Pleasing Goodness: This dish is sure to impress family and friends, similar to our popular Sticky Sweet Chili and Orange Chicken Homemade recipes.
Versatile Ingredients: Feel free to customize it by adding veggies or swapping chicken for tofu, making it adaptable for any dietary preference!
Get ready for a meal that will leave everyone satisfied and asking for more!
Sticky and Crispy Orange Chicken Ingredients
For the Crispy Chicken
- 2 large chicken thighs – Boneless and skinless; provides moistness and flavor. Substitution: Chicken breasts can be used for a leaner option.
- 1 teaspoon salt – Enhances flavor.
- 1 teaspoon ground pepper – Adds a slight heat.
- 1/2 cup cornstarch – Creates a crispy coating. Note: Can substitute with potato starch for a gluten-free option.
- 1 1/2 cups flour – Provides structure to the breading.
- 1 egg – Binds the breading mixture. Note: Can use a flax egg as a vegan alternative.
- 1 tablespoon oil – Adds flavor and prevents sticking in the batter.
- 1 1/8 cups water – Hydrates the batter.
- 3-4 cups oil for frying – Needed to deep fry; temperature crucial for achieving that signature crispiness.
For the Orange Sauce
- 1/2 cup orange juice – Main flavoring agent; adds acidity and sweetness.
- 1 teaspoon orange zest – Intensifies orange flavor.
- 2 tablespoons soy sauce – Adds umami depth. Substitution: Use tamari for gluten-free.
- 1/2 cup rice vinegar or white vinegar – Contributes tanginess.
- 1/4 cup brown sugar – Adds sweetness and helps with caramelization.
- 2 teaspoons minced garlic – Provides aromatic flavor.
- 2 tablespoons cornstarch – Used for thickening the sauce.
- 2 tablespoons water – To mix with cornstarch for the sauce.
- 1 tablespoon oil – Adds richness to the sauce.
Dive into crafting this Sticky and Crispy Orange Chicken, and enjoy every crunchy, tangy bite fresh from your kitchen!
Step‑by‑Step Instructions for STICKY AND CRISPY ORANGE CHICKEN
Step 1: Prepare the Chicken
Start by cutting the boneless chicken thighs into 1-inch cubes, ensuring even pieces for uniform cooking. Place the cubed chicken into a bowl and sprinkle with salt and ground pepper for flavor. Stir gently to coat the chicken evenly, setting the stage for a flavorful bite in your Sticky and Crispy Orange Chicken.
Step 2: Make the Breading Batter
In a separate mixing bowl, combine the cornstarch, flour, salt, and pepper until well-blended. Add the egg, 1 tablespoon of oil, and 1 1/8 cups of water, whisking until the mixture is smooth and free of lumps. This batter will create a delightful crispy coating that is crucial for your Sticky and Crispy Orange Chicken.
Step 3: Marinate the Chicken
Transfer the seasoned chicken cubes into the batter, ensuring each piece is completely coated. Cover the bowl with plastic wrap or a lid and let it marinate in the fridge for 30 to 60 minutes. This step is key for allowing the flavors to meld and the coating to adhere beautifully during frying.
Step 4: Heat the Oil
While the chicken marinates, pour 3 to 4 cups of oil into a deep frying pan or saucepan and heat it to 350°F (175°C). Use a thermometer to keep your oil at the right temperature, as this will help achieve a crispy texture. The oil should shimmer and ripple, signaling it’s ready for frying.
Step 5: Fry the Chicken
Carefully drop the marinated chicken pieces into the hot oil in small batches, ensuring not to overcrowd the pan. Fry each batch for about 5 minutes, or until the chicken turns golden brown and crispy. Use a slotted spoon to retrieve the cooked chicken, allowing excess oil to drain on paper towels for a perfect finish.
Step 6: Prepare the Orange Sauce
In a saucepan, combine the orange juice, orange zest, soy sauce, vinegar, brown sugar, and minced garlic over medium heat. Stir continuously while using a whisk to ensure the sugar dissolves. Once the mixture begins to simmer, mix cornstarch with 2 tablespoons of water in a small bowl, then add it to the sauce while stirring until thickened, about 5 minutes.
Step 7: Combine Chicken and Sauce
Once the sauce has thickened and becomes glossy, toss the crispy fried chicken pieces into the pan, ensuring every piece is well coated. This final step brings together the flavors in your Sticky and Crispy Orange Chicken, creating a mouthwatering dish ready to serve immediately.

How to Store and Freeze Sticky and Crispy Orange Chicken
Fridge: Store leftover chicken in an airtight container for up to 2 days to maintain freshness and flavor.
Freezer: For longer storage, freeze the chicken in a sealed bag or container for up to 3 months. This preserves its crispy texture when reheated properly.
Reheating: For best results, reheat in an oven at 375°F (190°C) for 10-15 minutes, allowing the coating to regain its crunchiness. Microwaving may result in sogginess.
Serving Suggestions: Pair with fresh steamed rice or a crisp side salad when serving the reheated Sticky and Crispy Orange Chicken.
What to Serve with Sticky and Crispy Orange Chicken
Brighten up your dinner table with sides and drinks that complement the vibrant flavors of this delightful dish.
-
Steamed Jasmine Rice: This fluffy rice absorbs the tangy sauce beautifully, making every bite a harmonious blend of flavors. Pairing it with the orange chicken makes for a satisfying meal.
-
Crisp Green Salad: A fresh salad with crisp lettuce, cucumbers, and a light vinaigrette adds crunch and balances the richness of the chicken. It’s a refreshing counterpoint to the dish’s boldness.
-
Garlic Bok Choy: Lightly sautéed bok choy with garlic brings a pop of color and a delicate crunch. Its earthy taste enhances the dish’s citrus notes perfectly, making your meal even more enticing.
-
Egg Fried Rice: Flavor-infused fried rice with peas, carrots, and scrambled egg provides a comforting side that echoes Asian cuisine. The savory elements round out the meal wonderfully.
-
Coconut Milk-Based Soup: A warm, comforting soup can be the perfect starter before diving into the main dish. The creamy coconut milk complements the citrus flavors while providing a rich texture for your palate.
-
Szechuan-style Noodles: These spicy noodles bring a little heat to your table and pair well with the sweetness of the orange chicken. They also add a delightful variety in texture.
-
Chilled Green Tea or Lemonade: Sip on refreshing drinks like green tea or a sparkling lemonade to cleanse your palate and enjoy with the orange chicken. Their lightness complements the dish without overwhelming it.
-
Mango Sticky Rice: For dessert, indulge in this sweet treat that combines sticky rice with coconut milk and ripe mango. It’s the perfect sweet conclusion to your zesty meal!
These pairings will enhance your experience of sticky and crispy orange chicken, creating a complete culinary delight for your family and friends.
Expert Tips for Sticky and Crispy Orange Chicken
-
Maintain Oil Temperature: Keep the oil at 350°F for perfectly crispy chicken; too low will make it greasy instead of crunchy.
-
Fry in Batches: Avoid overcrowding the pan to ensure each piece is fried evenly. Small batches help keep the oil temperature consistent.
-
Double Coat for Extra Crispiness: For a thicker coating, dip the chicken in the batter twice. This adds a delightful crunch to your Sticky and Crispy Orange Chicken.
-
Let It Rest: Allow fried chicken to drain on paper towels for a minute. This helps remove excess oil and keeps it crispy when combined with the sauce.
-
Customize Your Sauce: Feel free to experiment with adding Sriracha for heat or honey for sweetness, tailoring the flavor to your liking!
Make Ahead Options
Preparing your Sticky and Crispy Orange Chicken ahead of time is a fantastic way to save precious minutes on busy weeknights! You can marinate the chicken in the batter up to 24 hours in advance, just be sure to cover it tightly in the refrigerator to keep it fresh. Additionally, you can prepare the orange sauce up to 3 days ahead; store it in an airtight container in the fridge to maintain its vibrant flavors. When you’re ready to serve, simply fry the marinated chicken and toss it in the prepped sauce for a quick, delicious meal that tastes just as good as fresh. Enjoy effortless cooking while keeping your family’s favorite dish on the table!
Sticky and Crispy Orange Chicken Variations
Feel free to make this dish your own with these fun and delicious twists!
- Dairy-Free: Use almond milk in the batter instead of regular milk for a lactose-free option, maintaining the delightful crispiness.
- Spicy Kick: Add a tablespoon of Sriracha to the orange sauce to elevate the heat level while still preserving the sweet tanginess.
- Vegetarian Delight: Substitute chicken with tofu cubes or tempeh for a vegetarian-friendly alternative that soaks up the tasty orange sauce beautifully.
- Citrus Zing: Mix in a splash of lemon or lime juice to the sauce for a refreshing citrusy twist that brightens up the flavors.
- Sweet & Fuzzy: Adjust the sweetness by adding a bit of honey or agave syrup instead of brown sugar for a different layer of flavor.
- Crunchy Veggies: Toss in some diced bell peppers or broccoli along with the chicken to add a colorful crunch and boost the nutrition.
- Herb Infusion: Sprinkle in some chopped green onions or cilantro right before serving to give a fresh aroma and enhance the dish’s vibrant look.
- Crispy Potato Layer: Swap flour with crushed potato chips for the breading, resulting in an irresistibly crunchy texture that adds a fun twist to the original recipe.
These variations inspire creativity and cater to diverse dietary preferences. Whether you’re whipping up a family dinner or entertaining friends, each twist promises a delightful meal experience. And if you’re feeling adventurous, why not try it alongside our popular Honey Butter Chicken or Bbq Chicken Mac for a feast that satisfies every craving?
Sticky and Crispy Orange Chicken Recipe FAQs
How do I select ripe oranges for the sauce?
Absolutely! When choosing oranges, look for ones that feel heavy for their size and have a firm, smooth skin. Avoid any with dark spots or a dull appearance, as these might be overripe. Fresh oranges should yield slightly when pressed—this indicates ripeness and juiciness, perfect for your orange sauce!
What’s the best way to store leftovers?
Very! To keep your Sticky and Crispy Orange Chicken fresh, place any leftovers in an airtight container. They can be stored in the refrigerator for up to 2 days. Always ensure it’s completely cooled before sealing to avoid condensation, which can lead to sogginess.
Can I freeze my orange chicken?
Definitely! To freeze your Sticky and Crispy Orange Chicken, allow it to cool completely first. Then, place it in a freezer-safe bag or container, making sure to remove as much air as possible. It can be stored for up to 3 months. When it’s time to enjoy again, thaw overnight in the fridge before reheating in the oven to restore its delightful crunch.
What should I do if the breading falls off while frying?
Don’t worry! If the breading is coming off, it might be due to the batter not adhering properly. Ensure you coat the chicken completely and allow it to marinate for the recommended time. Also, double coating the chicken can help – dip it back into the batter after the first layer fries to create a thicker, crunchier exterior.
Is there a gluten-free option for this recipe?
Absolutely! You can easily make this Sticky and Crispy Orange Chicken gluten-free by substituting the all-purpose flour with a gluten-free flour blend and using tamari instead of soy sauce. Additionally, potato starch can replace cornstarch for coating. These adjustments will not only keep the dish gluten-free but also delicious!
Can I make this dish vegetarian?
Very much so! For a vegetarian twist, swap out the chicken for firm tofu. Cut the tofu into cubes and follow the same breading and frying instructions, ensuring it gets adequately coated with the batter. This way, you can still enjoy the crispy, flavorful essence of the dish while keeping it plant-based!

Deliciously Sticky and Crispy Orange Chicken Made Easy
Ingredients
Equipment
Method
- Cut the boneless chicken thighs into 1-inch cubes and season with salt and ground pepper.
- In a mixing bowl, combine cornstarch, flour, salt, and pepper. Add egg, oil, and water, whisking until smooth.
- Marinate the seasoned chicken in the batter for 30 to 60 minutes.
- Heat 3 to 4 cups of oil in a deep frying pan to 350°F (175°C).
- Fry the chicken pieces in small batches for about 5 minutes until golden brown and crispy.
- In a saucepan, combine orange juice, orange zest, soy sauce, vinegar, brown sugar, and minced garlic over medium heat, stirring until sugar dissolves.
- Mix cornstarch with water and add to the sauce, stirring until thickened, about 5 minutes.
- Toss the fried chicken pieces in the thickened sauce until well coated.