
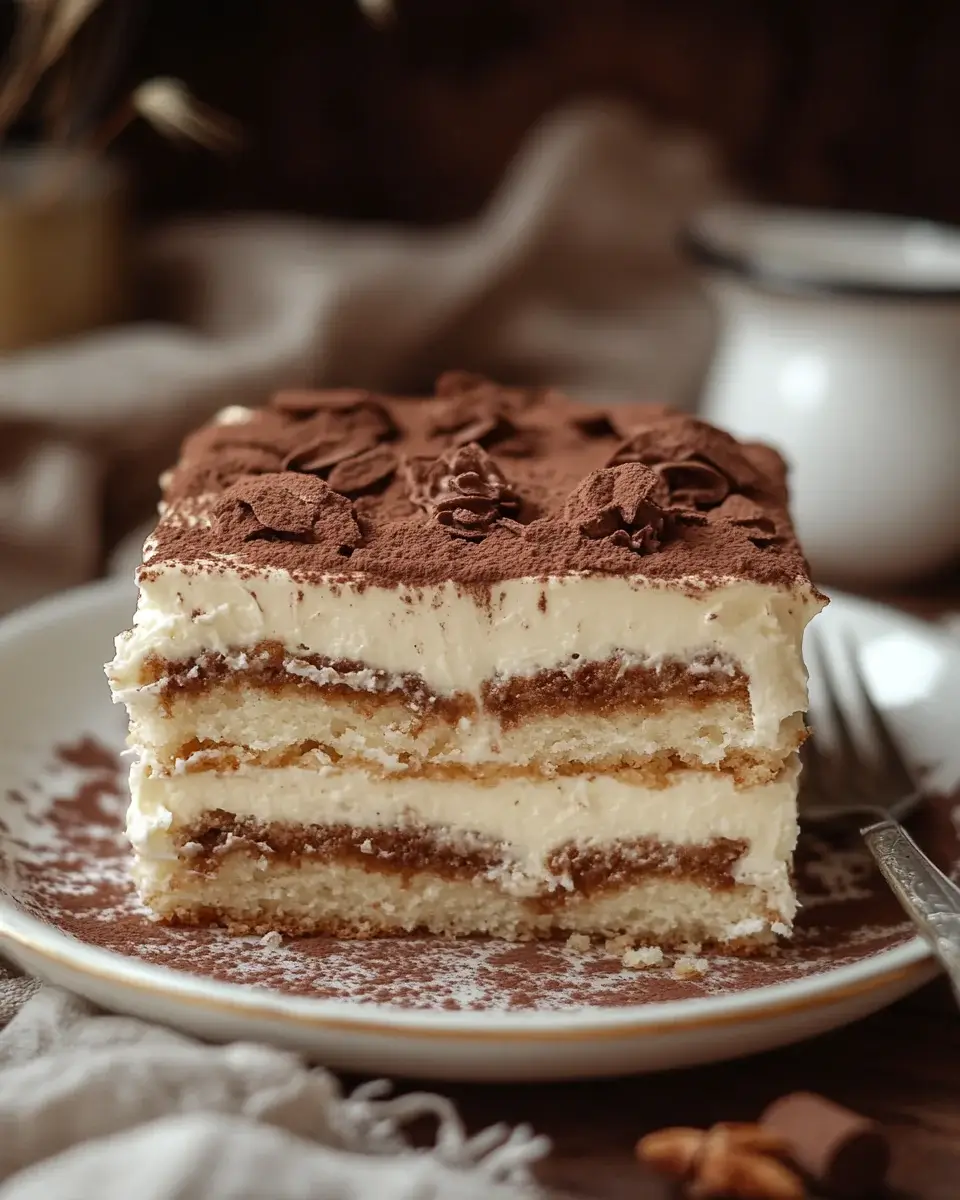
Introduction to Tiramisu Layer Cake
There’s something magical about dessert that brings people together, and this Tiramisu Layer Cake is no exception. I remember the first time I tasted tiramisu; it was at a family gathering, and the rich coffee flavor danced on my palate. This recipe combines that classic tiramisu essence with a moist cake, making it perfect for any occasion. Whether you’re looking to impress your loved ones or simply treat yourself after a long day, this cake is a delightful solution. Trust me, once you serve this, it’ll become a staple in your dessert repertoire!
Why You’ll Love This Tiramisu Layer Cake
This Tiramisu Layer Cake is a game-changer for dessert lovers. It’s surprisingly easy to whip up, even for those who might feel intimidated in the kitchen. The combination of rich coffee and creamy mascarpone creates a flavor explosion that’s hard to resist. Plus, it’s a showstopper at gatherings, making you the star of the dessert table. With just a little effort, you can create something truly special that everyone will adore!
Ingredients for Tiramisu Layer Cake
Gathering the right ingredients is the first step to creating this delightful Tiramisu Layer Cake. Here’s what you’ll need:
- All-purpose flour: The backbone of your cake, providing structure and texture.
- Baking powder: This helps the cake rise, giving it that fluffy texture we all love.
- Baking soda: A little extra lift, especially when paired with acidic ingredients like buttermilk.
- Salt: Just a pinch enhances the flavors and balances the sweetness.
- Unsalted butter: Adds richness and moisture; make sure it’s softened for easy mixing.
- Granulated sugar: Sweetens the cake and contributes to its tender crumb.
- Large eggs: They bind everything together and add moisture and richness.
- Vanilla extract: A splash of this adds a warm, aromatic flavor that complements the coffee.
- Buttermilk: This gives the cake a tender texture and a slight tang.
- Strong brewed coffee: The star of the show! It infuses the cake with that classic tiramisu flavor.
- Coffee liqueur (optional): For those who want to elevate the coffee flavor, this adds a delightful kick.
- Mascarpone cheese: The creamy, dreamy layer that makes tiramisu so indulgent.
- Heavy cream: Whipped to perfection, it adds lightness and volume to the cake.
- Powdered sugar: Sweetens the whipped cream and helps it hold its shape.
- Cocoa powder: For dusting, it adds a rich chocolatey finish that ties everything together.
- Dark chocolate shavings (optional): A fancy touch for garnish, adding a bit of elegance.
For exact measurements, check the bottom of the article where you can find everything listed for easy printing. Happy baking!
How to Make Tiramisu Layer Cake
Now that you have all your ingredients ready, let’s dive into the fun part: making this Tiramisu Layer Cake! Follow these steps, and you’ll be on your way to creating a dessert that will wow your friends and family.
Step 1: Preheat and Prepare
First things first, preheat your oven to 350°F (175°C). This ensures your cake bakes evenly. While that’s heating up, grease and flour two 9-inch round cake pans. This will help your cakes slide out easily once they’re baked.
Step 2: Mix Dry Ingredients
In a medium bowl, whisk together the all-purpose flour, baking powder, baking soda, and salt. This step is crucial as it evenly distributes the leavening agents, ensuring your cake rises beautifully.
Step 3: Cream Butter and Sugar
In a large mixing bowl, cream the softened butter and granulated sugar together until the mixture is light and fluffy. This usually takes about 3-4 minutes. The air you incorporate here will give your cake a lovely texture.
Step 4: Add Eggs and Vanilla
Next, add the eggs one at a time, mixing well after each addition. Stir in the vanilla extract. This adds a warm, inviting flavor that pairs perfectly with the coffee.
Step 5: Combine Wet and Dry Ingredients
Now, it’s time to bring it all together. Gradually add the dry ingredients to the butter mixture, alternating with the buttermilk. Mix until just combined. Be careful not to overmix; we want a tender cake!

Step 6: Bake the Cakes
Divide the batter evenly between the prepared cake pans. Bake for 25-30 minutes, or until a toothpick inserted into the center comes out clean. The aroma of coffee and vanilla will fill your kitchen—trust me, it’s heavenly!
Step 7: Cool the Cakes
Once baked, allow the cakes to cool in the pans for about 10 minutes. Then, transfer them to a wire rack to cool completely. This step is essential; you don’t want to slice into warm cakes!
Step 8: Prepare Coffee Mixture
While the cakes cool, combine the brewed coffee and coffee liqueur (if using) in a shallow dish. This mixture will soak into the cake layers, infusing them with that classic tiramisu flavor.
Step 9: Assemble the Cake
Once the cakes are completely cooled, slice each cake in half horizontally to create four layers. Place one layer on a serving plate, brush it generously with the coffee mixture, and spread a layer of mascarpone cheese on top. Follow this with a layer of whipped cream. Repeat this process with the remaining layers.
Step 10: Final Touches
After assembling, dust the top with cocoa powder and garnish with dark chocolate shavings if desired. Refrigerate the cake for at least 2 hours before serving. This allows the flavors to meld beautifully, making each bite a delightful experience!
Tips for Success
- Use room temperature ingredients for better mixing and a smoother batter.
- Don’t skip the cooling step; warm cakes can crumble when sliced.
- For a stronger coffee flavor, let the cakes soak longer in the coffee mixture.
- Feel free to experiment with flavored liqueurs for a unique twist.
- Always taste as you go; adjust sweetness to your preference!
Equipment Needed
- 9-inch round cake pans: If you don’t have these, any similar-sized pans will work.
- Mixing bowls: A large bowl for the batter and a medium bowl for dry ingredients.
- Whisk: A hand whisk or electric mixer will do the job.
- Wire rack: Essential for cooling; a plate can substitute in a pinch.
- Sharp knife: For slicing the cakes evenly.
Variations of Tiramisu Layer Cake
- Chocolate Tiramisu Layer Cake: Add cocoa powder to the cake batter for a rich chocolate flavor that complements the coffee.
- Fruit-Infused Tiramisu: Layer in fresh berries or sliced bananas between the cake layers for a fruity twist.
- Gluten-Free Option: Substitute all-purpose flour with a gluten-free blend to accommodate dietary needs.
- Vegan Tiramisu Layer Cake: Use plant-based butter, flax eggs, and coconut cream for a delicious vegan version.
- Nutty Variation: Incorporate ground almonds or hazelnuts into the batter for added texture and flavor.
Serving Suggestions for Tiramisu Layer Cake
- Pair with a rich espresso or cappuccino to enhance the coffee flavors.
- Serve alongside a scoop of vanilla ice cream for a delightful contrast.
- Garnish with fresh berries for a pop of color and freshness.
- Present on a beautiful cake stand for an elegant touch.
- Drizzle with chocolate sauce for an extra indulgent experience.

FAQs about Tiramisu Layer Cake
Can I make Tiramisu Layer Cake ahead of time?
Absolutely! This cake actually tastes better after a day in the fridge. Just assemble it, refrigerate, and serve it the next day for a more developed flavor.
What can I substitute for mascarpone cheese?
If you’re in a pinch, cream cheese mixed with a bit of heavy cream can work as a substitute. For a lighter option, try Greek yogurt mixed with a touch of vanilla.
How do I store leftover Tiramisu Layer Cake?
Store any leftovers in an airtight container in the fridge. It should stay fresh for about 3-4 days, but trust me, it won’t last that long!
Can I freeze Tiramisu Layer Cake?
Yes, you can freeze the cake! Wrap it tightly in plastic wrap and then foil. It can last up to 2 months in the freezer. Just thaw it in the fridge before serving.
Is Tiramisu Layer Cake suitable for kids?
While the cake is delicious, the coffee flavor might not appeal to all kids. You can make a kid-friendly version by omitting the coffee liqueur and using a milder coffee or even chocolate milk instead.
Final Thoughts
Creating this Tiramisu Layer Cake is more than just baking; it’s about crafting memories. Each layer tells a story, from the rich coffee aroma that fills your kitchen to the smiles it brings at the table. This cake is a celebration of flavors, a perfect blend of indulgence and comfort. Whether it’s a special occasion or a simple weeknight treat, this dessert has a way of making moments feel extraordinary. So, roll up your sleeves, gather your loved ones, and dive into this delightful experience. Trust me, every slice will be a sweet reminder of the joy of sharing good food!
Tiramisu Layer Cake: Discover This Irresistible Recipe!
Ingredients
Method
- Preheat your oven to 350°F (175°C). Grease and flour two 9-inch round cake pans.
- In a medium bowl, whisk together the flour, baking powder, baking soda, and salt. Set aside.
- In a large mixing bowl, cream the softened butter and granulated sugar together until light and fluffy, about 3-4 minutes.
- Add the eggs one at a time, mixing well after each addition. Stir in the vanilla extract.
- Gradually add the dry ingredients to the butter mixture, alternating with the buttermilk. Mix until just combined.
- Divide the batter evenly between the prepared cake pans. Bake for 25-30 minutes, or until a toothpick inserted into the center comes out clean.
- Allow the cakes to cool in the pans for 10 minutes, then transfer them to a wire rack to cool completely.
- In a shallow dish, combine the brewed coffee and coffee liqueur (if using). Set aside.
- Once the cakes are completely cooled, slice each cake in half horizontally to create four layers.
- To assemble, place one layer on a serving plate. Brush generously with the coffee mixture. Spread a layer of mascarpone cheese on top, followed by a layer of whipped cream (whip the heavy cream with powdered sugar until soft peaks form).
- Repeat the layering process with the remaining cake layers, brushing each with coffee and adding mascarpone and whipped cream in between.
- Once assembled, dust the top with cocoa powder and garnish with dark chocolate shavings if desired.
- Refrigerate the cake for at least 2 hours before serving to allow the flavors to meld.
Nutrition
Notes
- For a lighter version, substitute half of the mascarpone with Greek yogurt.
- You can also add a layer of chocolate ganache between the cake layers for an extra indulgent treat.