
With a quick flick of the wrist and a burst of creativity, I stumbled upon the delight that is Chocolate Peanut Butter Rice Krispie Cups—my latest obsession! These no-bake treats strike the perfect harmony between creamy peanut butter, rich chocolate, and the satisfying crunch of Rice Krispies. Best of all, they come together in mere minutes, making them a go-to option for those busy weeknights or unexpected guests. Plus, they’re entirely customizable—feel free to swap in your favorite nut butter or chocolate variation with ease! Whether you’re seeking a fun activity to enjoy with kids or a crowd-pleasing dessert for your next gathering, these cups deliver on every front. Curious to see how the magic unfolds? Let’s dive into the recipe!
Why Are These Cups So Irresistible?
Quick and Easy: The beauty of these Chocolate Peanut Butter Rice Krispie Cups lies in their no-bake nature. In just a few minutes, you can whip up a delightful treat that satisfies your sweet cravings.
Customizable Delight: Whether you prefer crunchy or creamy peanut butter, or want to experiment with dark chocolate, these cups allow for endless personalization.
Kid-Friendly Fun: Involving the little ones in making these cups can turn into a fun bonding activity—everyone loves to mix, spoon, and decorate!
Perfect for Any Occasion: From casual snacks to party desserts, these cups fit seamlessly into any gathering. Pair them with coffee or milk for a delightful afternoon treat!
Stored with Ease: These treats are perfect for meal prep! Store them in an airtight container for days or freeze for future indulgences.
Ready to indulge? Check out how to make these delightful cups in the full recipe!
Chocolate Peanut Butter Rice Krispie Cups Ingredients
For the Cups
• Rice Krispies – Provides structure and crunchy texture; can substitute with other crispy cereals if desired.
• Creamy Peanut Butter – Adds richness and nuttiness to the flavor profile; can use crunchy peanut butter for extra texture.
• Unsalted Butter – Helps bind the ingredients and adds richness; use margarine or coconut oil for dairy-free options.
• Mini Marshmallows – Creates a chewy texture and sweetness; can swap for marshmallow fluff or vegan marshmallows.
For the Topping
• Chocolate Chips – Topping provides sweetness and indulgence; dark chocolate can be used for a healthier twist.
• Vanilla Extract (optional) – Enhances flavor; omit if desired.
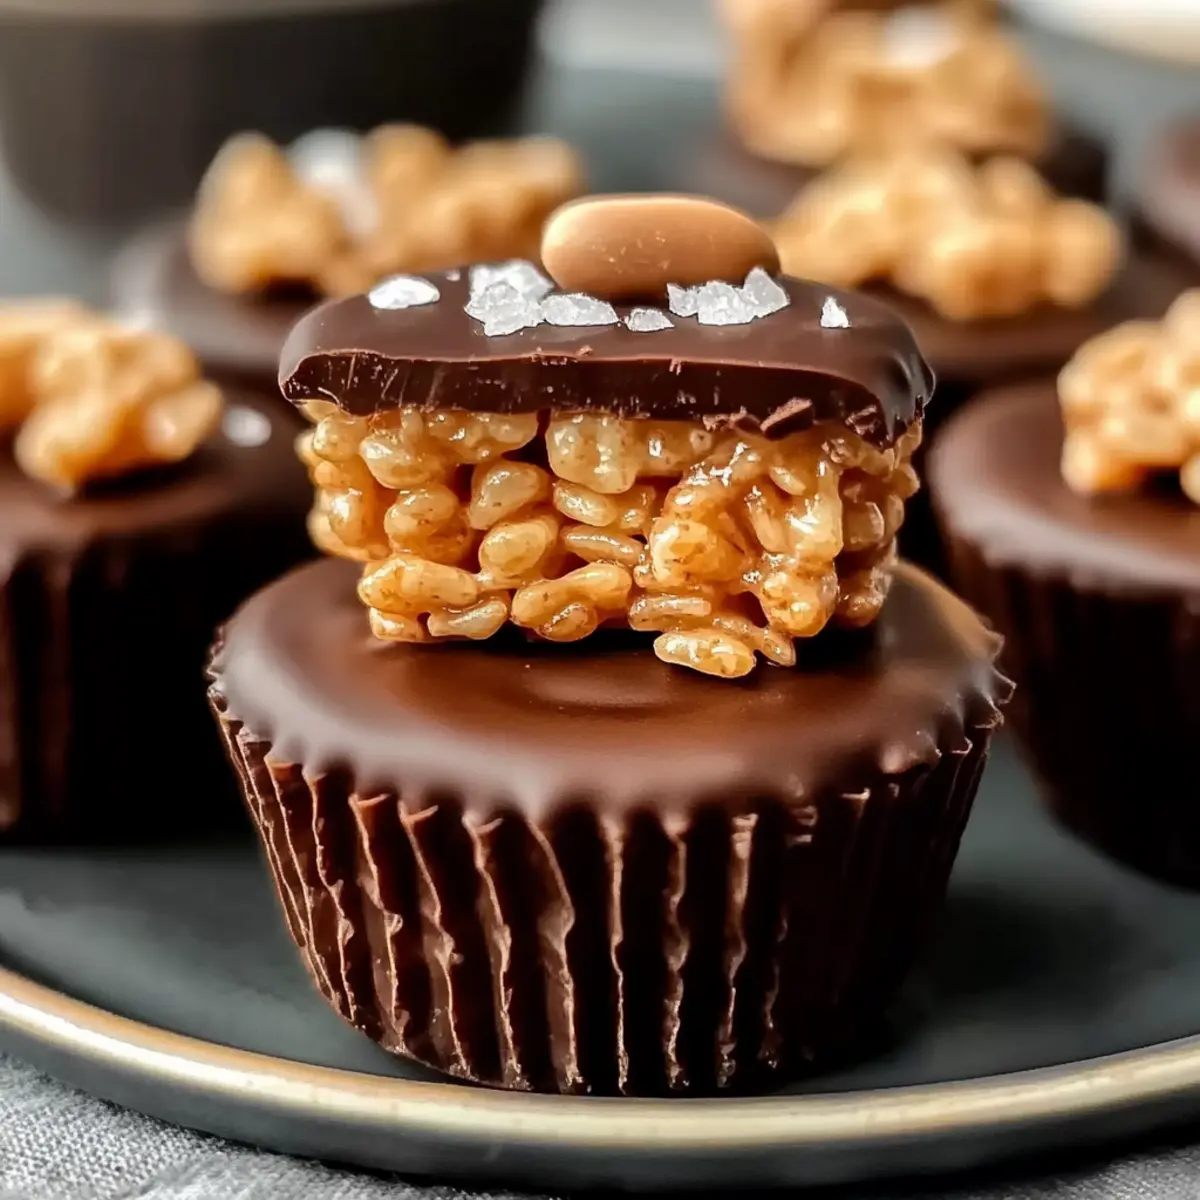
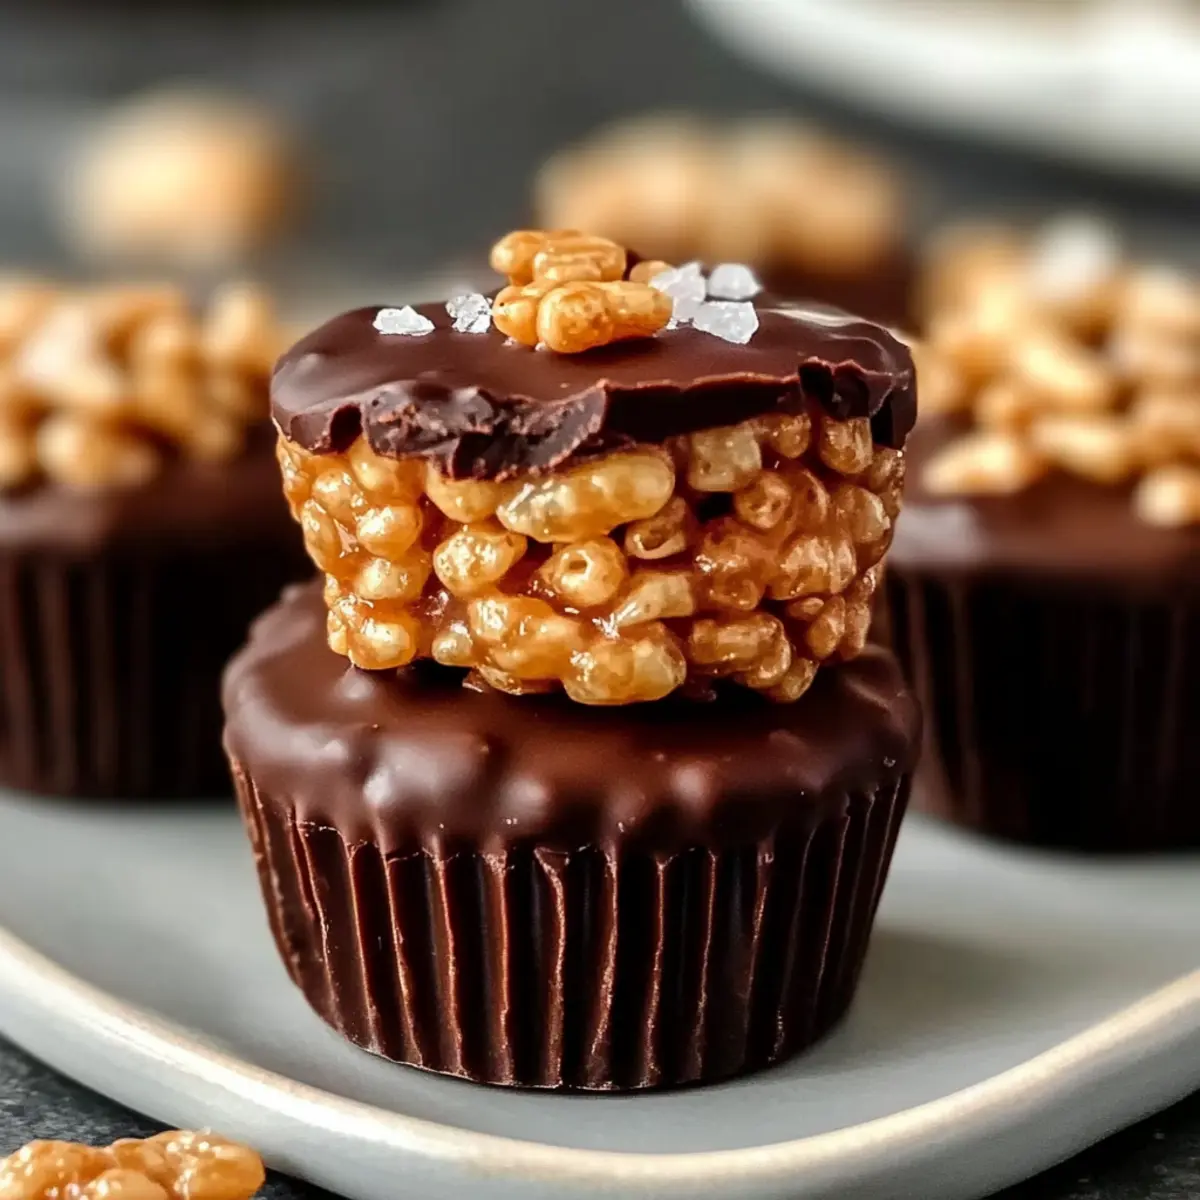
• Sea Salt (optional) – Balances sweetness and enhances flavor; a touch can make a real difference in your Chocolate Peanut Butter Rice Krispie Cups!
Step‑by‑Step Instructions for Chocolate Peanut Butter Rice Krispie Cups
Step 1: Melt Base
In a medium saucepan over low heat, melt 3 tablespoons of unsalted butter and 4 cups of mini marshmallows, stirring continuously until the mixture is smooth and completely combined, about 5-7 minutes. Keep an eye on it to avoid burning, as you want a gooey, stretchy base for your Chocolate Peanut Butter Rice Krispie Cups.
Step 2: Add Peanut Butter
Once the mixture is smooth, remove the saucepan from the heat and stir in 1 cup of creamy peanut butter until fully combined and creamy. This will create a luscious, rich mixture that serves as the backbone of your cups. The warm mixture should have a glossy finish, indicating it’s ready for the next step.
Step 3: Mix with Cereal
In a large mixing bowl, pour in 6 cups of Rice Krispies and gently fold the peanut butter mixture over the cereal. Use a spatula to ensure every Rice Krispie is evenly coated without crushing them, creating a delightful crunch in your Chocolate Peanut Butter Rice Krispie Cups. It should take you about 2-3 minutes of gentle folding.
Step 4: Shape Cups
Line a standard muffin tin with paper liners, then spoon the mixture into each cup, filling them about two-thirds full. With slightly damp hands, press down gently on the mixture to form a cup shape. This step is crucial for ensuring the cups hold together well and maintain their shape once set.
Step 5: Add Chocolate Layer
In a microwave-safe bowl, melt 1 cup of chocolate chips in 30-second intervals, stirring in between until smooth and melted completely, which usually takes about 1-2 minutes. Spoon the melted chocolate atop each Rice Krispie cup, spreading it evenly for a decadent finish. If desired, sprinkle a touch of sea salt on top to enhance the flavors.
Step 6: Set & Serve
Allow the Chocolate Peanut Butter Rice Krispie Cups to cool at room temperature for about 30 minutes, or refrigerate for faster setting, about 20 minutes. Once firm, carefully remove the cups from the muffin tin by peeling off the paper liners. These delicious treats are now ready to satisfy your sweet tooth!

Make Ahead Options
These Chocolate Peanut Butter Rice Krispie Cups are a fantastic choice for meal prep! You can prepare the base mixture (steps 1-3) up to 24 hours in advance; simply keep it covered in the refrigerator to maintain its quality. For best results, assemble the Rice Krispie cups in the muffin tin (step 4) and chill for a faster set. When you’re ready to serve, melt the chocolate (step 5) and add that decadent layer right before indulging. This way, you’ll enjoy equally delicious treats without any stress on busy days, ensuring your sweet cravings are satisfied with minimal effort!
Storage Tips for Chocolate Peanut Butter Rice Krispie Cups
Room Temperature: Store your chocolate peanut butter rice Krispie cups in an airtight container at room temperature for up to 3-5 days to maintain their delightful crunch.
Fridge: You can refrigerate the cups if you prefer a cooler treat; just ensure they’re well-wrapped to prevent moisture from affecting their texture.
Freezer: For longer storage, individually wrap each cup and freeze for up to one month. Thaw in the fridge for a few hours before enjoying.
Reheating: There’s no need to reheat these cups; they are best enjoyed chilled or at room temperature, retaining their original delicious flavors and textures.
Chocolate Peanut Butter Rice Krispie Cups Variations
Feel free to make these delicious treats uniquely yours with a few simple twists!
-
Crunchy Peanut Butter: Use crunchy peanut butter instead of creamy for added texture and a delightful crunch. Kids will love the contrast!
-
Vegan Option: Swap marshmallows for vegan marshmallows and use coconut oil instead of butter for a completely dairy-free treat. It’s just as satisfying!
-
Flavor Enhancements: Substitute dark chocolate chips for a richer chocolate flavor or try butterscotch chips for a sweet twist. Your taste buds will be dancing!
-
Nutty Addition: Toss in some chopped nuts, like almonds or walnuts, for extra crunch and a nutty punch. It’s a lovely surprise in each bite!
-
Syrup Swirl: Drizzle some caramel sauce over the melted chocolate layer for a sweet surprise. This adds a gooey, indulgent layer to your cups!
-
Spicy Kick: For those who love a bit of heat, sprinkle in a touch of cinnamon or cayenne pepper to the peanut butter mixture. This unexpected twist will keep your guests guessing!
-
Alternative Cereals: Replace Rice Krispies with other crispy cereals, like Cheerios or Cornflakes, for a unique texture. Each cereal brings its own flavor!
-
Mini Treats: Instead of muffin-sized cups, scoop the mixture into a mini muffin tin for bite-sized delights perfect for sharing. A fun twist that everyone will adore!
These variations not only keep your cooking exciting, but serve as a fantastic way to use ingredients you have on hand. Feeling adventurous? Try pairing your cups with a warm beverage or enjoy them alongside a Garlic Butter Honey chicken for a fun dessert night!
Expert Tips for Chocolate Peanut Butter Rice Krispie Cups
- Low Heat Magic: Keep the heat low when melting butter and marshmallows to prevent burning, ensuring a smooth and stretchy base for your Chocolate Peanut Butter Rice Krispie Cups.
- Gentle Mixing: Fold the Rice Krispies into the peanut butter mixture gently to maintain their crunch. Avoid over-mixing to keep that delightful texture intact!
- Perfectly Shaped Cups: When pressing the mixture into the muffin tins, dampen your hands slightly. This prevents sticking and helps form perfect cup shapes that hold well.
- Chill to Set: Refrigerate the cups for at least 20 minutes after adding the chocolate layer. This step ensures they firm up nicely for easy removal and a great texture.
- Flavor Enhancements: Consider adding a pinch of sea salt or a splash of vanilla extract to elevate the flavor of your Chocolate Peanut Butter Rice Krispie Cups. Enjoy experimenting!
What to Serve with Chocolate Peanut Butter Rice Krispie Cups?
These delightful treats invite a variety of complementary flavors and textures to build a full meal experience.
- Fresh Fruit Salad: A medley of sweet, juicy fruits balances the rich flavors of the cups, providing a refreshing contrast.
- Creamy Vanilla Ice Cream: Soft, creamy ice cream enhances the treat, adding an indulgent creaminess that tempers the crunch. Imagine a scoop melting against the chocolate layer.
- Cold Glass of Milk: A classic pairing, milk brings out the nostalgia of childhood snacks, making every bite feel comforting and familiar.
- Hot Cocoa: For the ultimate treat experience, serve with a warm mug of cocoa. The warm chocolate exudes a coziness that complements the peanut butter goodness.
- Crunchy Granola: Add a sprinkle of crunchy granola for an extra layer of texture and nutty flavor, enhancing the overall experience of the cups.
- Coffee: A bold cup of coffee provides a wonderful flavor balance, perfect for those afternoon cravings while enjoying a sweet treat.
- Caramel Sauce Drizzle: A generous drizzle of caramel can turn these cups into gourmet treats, enhancing their sweetness with a rich buttery flavor.
- Nutty Trail Mix: Offer a side of nutty trail mix for a crunchy, savory complement that contrasts beautifully with the sweet, creamy cups.
Each of these pairings will elevate your Chocolate Peanut Butter Rice Krispie Cups, turning them into a memorable moment!
Chocolate Peanut Butter Rice Krispie Cups Recipe FAQs
What type of Rice Krispies should I use?
You can use traditional Rice Krispies for the classic crunch, but feel free to substitute them with any crispy cereal you enjoy, such as gluten-free options or even homemade granola for a unique twist!
How should I store the Chocolate Peanut Butter Rice Krispie Cups?
Store your Chocolate Peanut Butter Rice Krispie Cups in an airtight container at room temperature for up to 3-5 days. This way, they’ll stay delightful and crisp! If you prefer, refrigerate them to keep them cool; just make sure they’re covered to prevent moisture from getting in.
Can I freeze these cups for later?
Absolutely! To freeze, individually wrap each cup in plastic wrap or foil and place them in an airtight freezer bag. They can be frozen for up to one month. When you’re ready to enjoy one, simply thaw it in the fridge for a few hours or at room temperature for about 30 minutes.
What if the mixture is too sticky when mixing in the Rice Krispies?
If you find the mixture is too sticky, you can lightly dampen your hands or use a spatula to help fold in the Rice Krispies without making a mess. This will keep the crispy texture and help ensure everything is evenly combined without crushing the cereal.
Are these cups safe for individuals with nut allergies?
If you’re making these cups for someone with nut allergies, it’s best to substitute the peanut butter with sunflower seed butter or another nut-free spread. Always check the labels on all ingredients, especially marshmallows and chocolate, to ensure they don’t contain any hidden allergens.
How do I enhance the flavor of the Chocolate Peanut Butter Rice Krispie Cups?
For an extra flavor kick, you can add a pinch of sea salt to the chocolate layer before it sets or mix in a splash of vanilla extract with the peanut butter to deepen the taste. Feel free to experiment with add-ins like crushed pretzels or mini candies to customize your treats even more!

Irresistible Chocolate Peanut Butter Rice Krispie Cups Recipe
Ingredients
Equipment
Method
- In a medium saucepan over low heat, melt the butter and mini marshmallows, stirring continuously until smooth, about 5-7 minutes.
- Once smooth, remove from heat and stir in the peanut butter until fully combined.
- In a large mixing bowl, pour in the Rice Krispies and gently fold in the peanut butter mixture.
- Line a muffin tin with paper liners and spoon the mixture into each cup, pressing down gently to form a cup shape.
- Melt the chocolate chips in a microwave-safe bowl in 30-second intervals, then spoon over each cup.
- Allow to cool at room temperature for about 30 minutes or refrigerate for 20 minutes until set.