
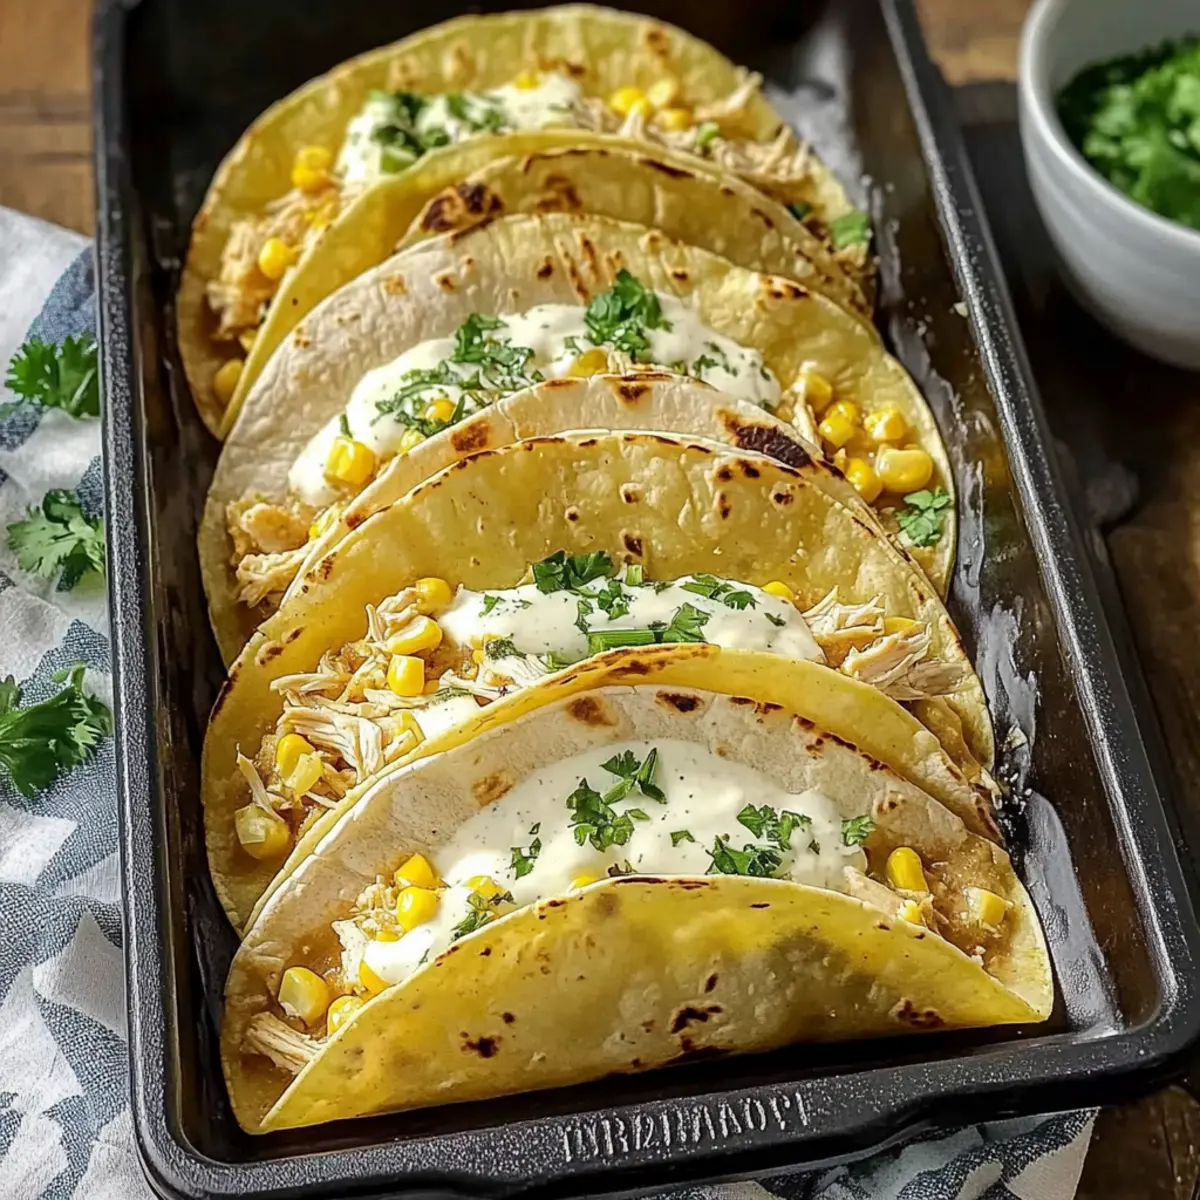
“Two minutes to dinner!” was the cheerful battle cry echoing from the kitchen, as I gazed at the clock and felt the familiar weeknight crunch. Nothing says quick weeknight dinner like my Best White Chicken Chili Tacos with Creamy Green Chili Sauce. These little bundles of joy are not just a breeze to whip up—they’re also the perfect way to use leftover rotisserie chicken. The blend of creamy, tangy flavors from the sour cream and green chilis, combined with tender shredded chicken and sweet corn, makes these tacos a surefire family favorite. In mere minutes, you can create a meal that’s both satisfying and fun, bringing everyone to the table with smiles. Look no further for a recipe that’s adaptable based on whatever you have on hand. Curious how to make these delightful tacos that will win over even the pickiest eaters? Let’s dive in!
Why You’ll Love These Tacos
Quick and Easy: With just a few simple steps, you can turn your kitchen into a taco haven in no time!
Family-Friendly: These deliciously creamy tacos are sure to please everyone, from kids to adults, making dinner a delightful occasion.
Versatile Filling: Use up leftover rotisserie chicken or get creative with your favorite proteins and toppings for a unique twist every time!
Comforting Flavor: The creamy green chili sauce paired with sweet corn and spices creates a taste sensation that feels like a warm hug on a plate.
Perfect for Busy Nights: Whether you’re scrambling for a weeknight meal or hosting a casual get-together, these tacos are your go-to. Pair them with a delicious side like Garlic Butter Tacos for a complete feast!
White Chicken Chili Tacos Ingredients
• Ready to make the best White Chicken Chili Tacos? Here’s everything you need!
For the Creamy Sauce
- Sour Cream – Adds creaminess; let it come to room temperature for a smooth blend.
- Canned Green Chilis – Offers mild heat and flavor; opt for fresh chilis if you want it spicier.
- Ground Cumin – Delivers earthy depth; freshly ground is best for maximum aroma.
- All-Purpose Flour – Helps thicken the sauce; substitute with cornstarch for a gluten-free option.
- Chili Powder – Brings a nice spice; adjust according to your taste preference.
- Skim Milk – Balances the sauce’s richness; whole or non-dairy milk are great alternatives.
- Chicken Broth – Enhances flavor; swap with vegetable broth for a vegetarian twist.
- Unsalted Butter – Essential for making the roux; can be replaced with olive oil or margarine.
For the Taco Filling
- Green Onions – Adds freshness and crunch; regular onions can work in a pinch but will alter the flavor.
- Shredded Chicken – The heart of the filling; use leftover rotisserie chicken or homemade shredded chicken.
- Frozen Corn – Sweetens and adds texture; fresh or canned corn is a fine substitute.
For the Tacos
- Corn Tortillas – Wrap your filling, ensuring they’re warmed to prevent tearing; flour tortillas are softer but also delicious.
- Shredded Mozzarella Cheese – Adds a creamy, cheesy finish; consider cheddar or dairy-free cheese as alternatives.
Get ready to dig in and delight your family with these scrumptious White Chicken Chili Tacos!
Step‑by‑Step Instructions for White Chicken Chili Tacos
Step 1: Preheat Oven
Begin by preheating your oven to 400°F (200°C). This will ensure that your White Chicken Chili Tacos get that golden, crispy finish once they’re ready to bake. While the oven warms up, you can focus on prepping your ingredients for a seamless assembly of these delightful tacos.
Step 2: Prep Your Ingredients
Gather all the ingredients for your White Chicken Chili Tacos and measure out your milk, chicken broth, and sour cream, letting the sour cream come to room temperature. Chop the canned green chilis and slice the green onions, keeping everything organized and ready for the next steps. This mise en place will make the cooking process much smoother.
Step 3: Make the Roux
In a medium saucepan, melt 2 tablespoons of unsalted butter over medium heat. Once melted, whisk in 2 tablespoons of all-purpose flour to create a roux, cooking it for about 1 minute until it turns a light golden color. This roux will serve as the thickening agent for your creamy sauce, offering richness and depth to your tacos.
Step 4: Create the Creamy Sauce
Gradually pour in 1 cup of skim milk and 1 cup of chicken broth into the roux, whisking continuously to prevent lumps. Add in your room temperature sour cream and keep whisking until the mixture is smooth and well combined. Cook it on medium-low heat until the sauce thickens slightly, which should take about 3-5 minutes.
Step 5: Season the Sauce
Stir in 1 teaspoon of ground cumin, the chopped green chilis, 1 tablespoon of chili powder, and salt and black pepper to taste. Allow the sauce to simmer gently for a few more minutes, letting the flavors meld beautifully. You’ll know it’s done when it coats the back of a spoon nicely, inviting you to taste its creamy goodness.
Step 6: Prepare the Filling
In a large mixing bowl, combine 2 cups of shredded chicken, 1 cup of frozen corn, and the sliced green onions. Pour your luscious creamy sauce over the mixture and stir everything together until well combined, ensuring each piece of chicken is coated with that delicious sauce. This filling will provide both flavor and texture to your tacos.
Step 7: Warm the Tortillas
Warm your corn tortillas in a skillet over medium heat for about 30 seconds on each side, just until they are pliable and warmed through. This step is crucial as it prevents tearing when you fill and fold your White Chicken Chili Tacos. Avoid rushing this step to ensure every taco has a beautiful wrap.
Step 8: Fill the Tacos
Spoon about 3 tablespoons of the chicken filling onto the center of each tortilla. Top each filling with a sprinkle of shredded mozzarella cheese, which will melt beautifully during baking. Carefully fold the tortillas over the filling, sealing them so none of that creamy goodness escapes while cooking.
Step 9: Bake the Tacos
Arrange the folded tacos on a baking sheet and place them in your preheated oven. Bake for 12-15 minutes, or until the cheese is melted and bubbly, and the tortillas are golden brown. Keep an eye on them as they bake, enjoying the comforting aroma filling your kitchen.
Step 10: Serve and Enjoy
Once baked, remove your White Chicken Chili Tacos from the oven and let them cool slightly before serving. They are perfect with toppings like salsa or a dollop of fresh sour cream on the side. Your family will gather around the table, eagerly anticipating the first delicious bite of these creamy, flavorful tacos!
Expert Tips for White Chicken Chili Tacos
-
Roux Timing: Take your time with the roux; cooking it for a minute helps eliminate any raw flour taste, ensuring a delicious sauce.
-
Whisk Gradually: When adding liquids for the sauce, do it slowly while whisking to prevent lumps from forming. A smooth sauce is key!
-
Toasting Tortillas: Always warm your corn tortillas properly before filling. A quick toast keeps them pliable and prevents tearing when you fold them.
-
Proper Filling Amount: Aim for 2-3 tablespoons of filling per taco; overfilling can lead to messy tacos that don’t hold together during baking.
-
Cheese Choices: Feel free to experiment with different cheeses like cheddar or pepper jack for a flavor kick; just make sure it melts well for that gooey texture.
Make Ahead Options
These delicious White Chicken Chili Tacos are perfect for busy weeknights and can easily be prepped in advance! You can prepare the creamy sauce and filling up to 3 days ahead of time. To do this, simply follow the steps to make the sauce and combine it with the shredded chicken and corn, storing it in an airtight container in the refrigerator. When you’re ready to serve, warm the mixture in a saucepan until heated through, fill your tortillas with about 3 tablespoons of the mixture, and pop them in the oven for 12-15 minutes until cheese is bubbly and tortillas are golden. This way, you’ll have a flavorful, comforting meal with minimal effort—just as delicious as freshly made!
How to Store and Freeze White Chicken Chili Tacos
Fridge: Store any leftover filling in an airtight container for up to 4 days. Keep tortillas separate to maintain their texture.
Freezer: The filling freezes beautifully for up to 3 months. Portion it out in freezer-safe containers, making it easy to thaw for a speedy meal later.
Reheating: Warm the leftover filling gently in a saucepan over low heat, adding a splash of chicken broth if needed to achieve the desired consistency.
Tortilla Tips: If you’ve frozen the filling, warm the corn tortillas in a skillet before filling to ensure they don’t tear during assembly.
What to Serve with Best White Chicken Chili Tacos
Get ready to elevate your taco night with delightful sides and pairings that complement the creamy flavors of your dish!
-
Mexican Rice: This flavorful side dish is a classic pairing, soaking up all the creamy goodness from your tacos.
-
Crispy Tortilla Chips: Serve these crunchy, golden chips with homemade guacamole for a delightful contrast to the creamy taco filling. Their satisfying crunch amplifies the taco-loving experience!
-
Fresh Pico de Gallo: The vibrant, tangy salsa made with tomatoes, onions, and cilantro adds a refreshing touch, balancing the richness of the tacos beautifully.
-
Creamy Avocado Salad: Combining avocado, lime juice, and spice, this salad cuts through the richness of the tacos with its fresh, zesty notes.
-
Spicy Black Beans: Their earthy flavor and slight heat provide a great contrast to the creamy tacos, creating a well-rounded meal that’s both filling and nutritious.
-
Chilled Lime Agua Fresca: A refreshing drink that perfectly complements spicy and creamy recipes alike, bringing a cooling effect with every sip.
-
Sweet Corn on the Cob: Toss it on the grill for a touch of sweetness; its natural sugar enhances the flavors of the chili tacos while adding a delightful crunch.
White Chicken Chili Tacos Variations
Feel free to get creative and tailor these tacos to your taste or pantry on hand!
-
Pork Substitute: Swap shredded chicken for pulled pork for a smoky and savory twist, perfect for barbecue lovers!
-
Vegetarian Delight: Use black beans instead of chicken for a hearty vegetarian option. The beans add protein and a delightful texture.
-
Cheesy Spin: Try different cheese varieties like pepper jack for extra spice or gouda for a creamy, smoky flavor boost.
-
Fresh & Zesty: Add diced avocados or a sprinkle of lime juice for a fresh, zesty finish that brightens every bite of your tacos.
-
Spicy Kick: Incorporate diced jalapeños into the filling for a fiery kick that gives these tacos a bold, exciting flavor.
-
Flavorful Additions: Toss in sautéed bell peppers or corn for extra sweetness and color that adds both taste and texture to your filling.
-
Crispy Tacos: For a fun variety, crisp up the filled tacos by frying them in a little oil instead of baking for a crunchy delight.
-
Topping Ideas: Try topping your tacos with fresh cilantro, diced tomatoes, or a drizzle of salsa to amp up the flavor and presentation!
These variations will set the stage for endless family-favorite taco nights. If you’re in the mood for something else, check out our delicious Santa Chicken Skillet for an easy weeknight dinner!
White Chicken Chili Tacos Recipe FAQs
What type of chicken should I use for these tacos?
I recommend using shredded rotisserie chicken for a quick and flavorful base, but you can also cook and shred your own chicken if you prefer. Boneless skinless chicken thighs can add extra moisture and flavor, making them a wonderful choice as well.
How should I store leftover filling?
You can store any leftover filling in an airtight container in the refrigerator for up to 4 days. Just remember to keep the corn tortillas separate to ensure they maintain their texture and don’t become soggy.
Can I freeze the filling for later use?
Absolutely! The filling freezes beautifully for up to 3 months. Portion it into freezer-safe containers before freezing. When you’re ready to enjoy, simply thaw it in the refrigerator overnight, then warm it thoroughly in a saucepan, adding a splash of chicken broth if needed to help regain its creamy consistency.
What should I do if my sauce is too thick?
If your sauce turns out thicker than you’d like, simply add a bit more chicken broth or milk, whisking it in gradually over low heat until you achieve your desired consistency. Don’t worry; adjusting the thickness is quite common, and the sauce will still be delicious!
Are there any dietary considerations?
Yes! If you have allergies, ensure to check your ingredients—like sour cream and cheese. For a dairy-free option, you can use non-dairy sour cream and cheese. If you’re preparing for kids or those who prefer milder dishes, feel free to skip the chili powder or use less of it for a more gentle flavor.
What can I serve with these tacos?
These White Chicken Chili Tacos are delicious on their own, but they’re even better when paired with sides like Mexican rice, fresh pico de gallo, or crispy tortilla chips with guacamole. Enjoy the feast!

White Chicken Chili Tacos: Quick and Creamy Family Favorite
Ingredients
Equipment
Method
- Preheat your oven to 400°F (200°C).
- Gather ingredients, measure out liquids, and let sour cream reach room temperature.
- Melt unsalted butter in a saucepan, then whisk in all-purpose flour to form a roux.
- Gradually pour in skim milk and chicken broth while whisking continuously.
- Stir in ground cumin, green chilis, chili powder, and seasoning to taste. Simmer to thicken.
- Combine shredded chicken, corn, and green onions in a bowl. Mix with the creamy sauce.
- Warm corn tortillas in a skillet for 30 seconds on each side.
- Spoon filling onto tortillas and sprinkle with mozzarella cheese, then fold them over.
- Bake the folded tacos for 12-15 minutes until golden and cheese is melted.
- Remove from oven, let cool slightly, and serve with toppings like salsa.