

Introduction to Easy Flag Cake
There’s something magical about a dessert that not only tastes great but also brings a smile to your face. The Easy Flag Cake is just that—a delightful treat that’s perfect for any celebration. Whether it’s a backyard barbecue or a festive gathering, this cake is a quick solution for a busy day. With its vibrant colors and simple preparation, it’s sure to impress your loved ones. Plus, who doesn’t love a dessert that looks as good as it tastes? Let’s dive into this patriotic delight that’s as easy to make as it is to enjoy!
Why You’ll Love This Easy Flag Cake
This Easy Flag Cake is a game-changer for anyone who loves to celebrate without the fuss. It’s incredibly simple to whip up, making it perfect for those last-minute gatherings. The taste? Oh, it’s a delightful blend of fluffy cake and fresh fruit that dances on your palate. Plus, the vibrant flag design adds a festive touch, making it a showstopper at any event. You’ll be the hero of the party with minimal effort!
Ingredients for Easy Flag Cake
Gathering the right ingredients is the first step to creating your Easy Flag Cake. Here’s what you’ll need:
- All-purpose flour: The backbone of your cake, providing structure and texture.
- Granulated sugar: Sweetens the cake and helps achieve that fluffy texture.
- Unsalted butter: Adds richness and moisture; make sure it’s softened for easy mixing.
- Milk: Keeps the cake moist and tender; whole milk works best for creaminess.
- Baking powder: The leavening agent that helps the cake rise beautifully.
- Vanilla extract: A splash of flavor that elevates the cake’s taste.
- Salt: Just a pinch enhances the sweetness and balances flavors.
- Large eggs: They bind the ingredients together and add moisture.
- Fresh strawberries: These juicy gems create the red stripes of the flag; hulled and sliced for easy placement.
- Fresh blueberries: Perfect for the blue field of the flag, adding a burst of flavor.
- Whipped cream: The fluffy topping that brings it all together; you can use store-bought or make your own.
For those looking to mix things up, consider using raspberries instead of strawberries for a different flavor profile. You can also sneak in a layer of lemon curd under the whipped cream for a zesty surprise. Exact quantities for each ingredient are available at the bottom of the article for easy printing!
How to Make Easy Flag Cake
Step 1: Preheat and Prepare
Start by preheating your oven to 350°F (175°C). While it warms up, grab a 9×13-inch baking pan and grease it with butter or cooking spray. Then, dust it with flour to ensure your cake slides out easily once baked. This simple prep makes all the difference!
Step 2: Cream Butter and Sugar
In a large mixing bowl, combine the softened butter and granulated sugar. Using an electric mixer, beat them together until the mixture is light and fluffy. This step is crucial; it incorporates air into the batter, giving your Easy Flag Cake that delightful texture we all love.
Step 3: Add Eggs and Vanilla
Next, add the eggs one at a time, mixing well after each addition. This ensures they blend smoothly into the batter. Don’t forget to stir in the vanilla extract, which adds a warm, inviting flavor to your cake. Trust me, it’s worth it!
Step 4: Combine Dry Ingredients
In a separate bowl, whisk together the all-purpose flour, baking powder, and salt. This step helps distribute the baking powder evenly, ensuring your cake rises beautifully. It’s a small but important detail that can elevate your Easy Flag Cake to the next level.
Step 5: Mix Wet and Dry Ingredients
Now, it’s time to bring it all together! Gradually add the dry mixture to the wet ingredients, alternating with the milk. Mix until just combined; overmixing can lead to a dense cake. You want that light, fluffy texture that makes this dessert so irresistible!
Step 6: Bake the Cake
Pour the batter into your prepared baking pan, spreading it evenly. Pop it into the preheated oven and bake for 30-35 minutes. Keep an eye on it! A toothpick inserted in the center should come out clean when it’s done. Your kitchen will smell heavenly!
Step 7: Cool and Frost
Once baked, remove the cake from the oven and let it cool completely in the pan on a wire rack. This cooling step is essential before frosting. Once cool, spread a generous layer of whipped cream over the top, creating a fluffy canvas for your flag design.
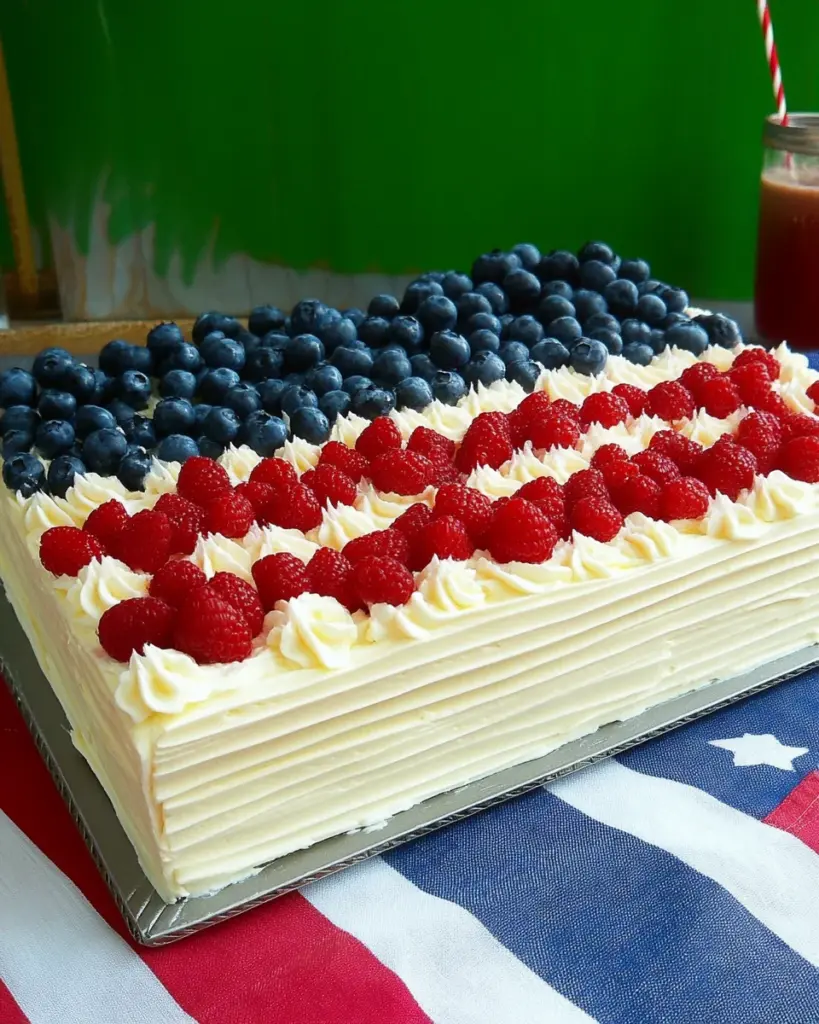
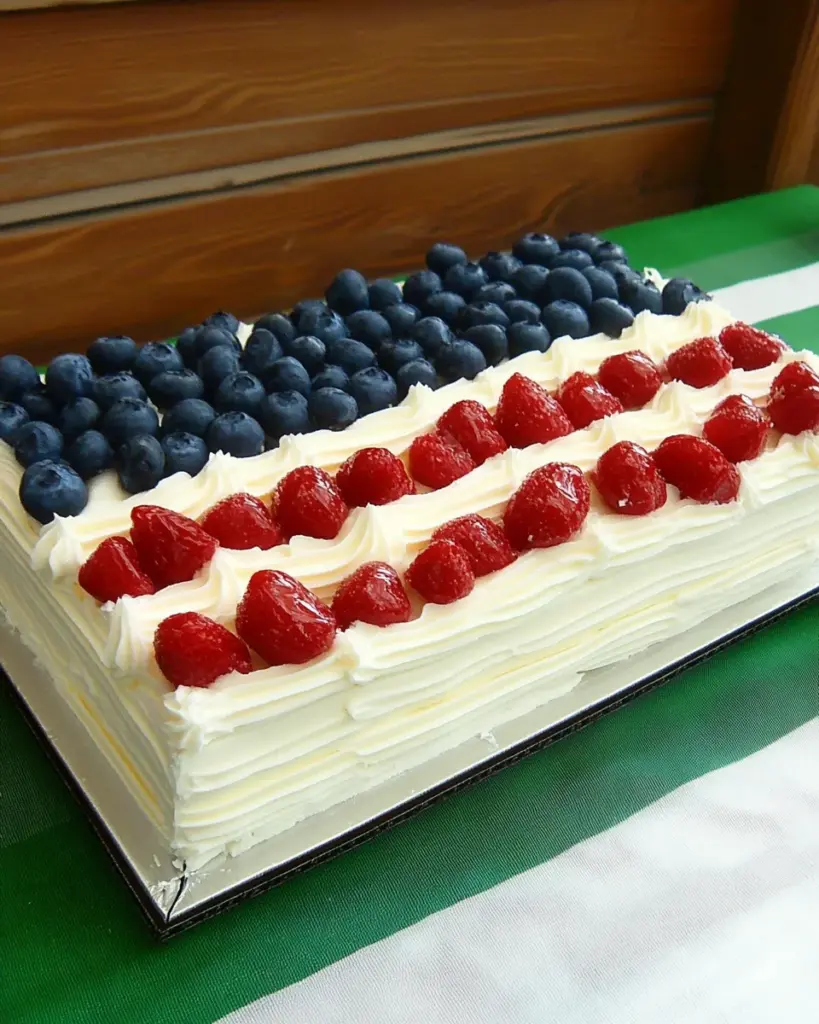
Step 8: Create the Flag Design
Now comes the fun part! Arrange the sliced strawberries in a rectangle in the top left corner to form the stripes of the flag. Use the blueberries to fill in the remaining area. Get creative! This is where your Easy Flag Cake truly shines and becomes a festive centerpiece.
Step 9: Chill Before Serving
Finally, chill the cake in the refrigerator for at least 30 minutes. This helps set the whipped cream and makes slicing easier. Plus, it’s a refreshing treat on a warm day. When you’re ready to serve, slice it up and watch the smiles appear!
Tips for Success
- Make sure your butter is softened for easy mixing; it should be at room temperature.
- Use fresh, ripe strawberries and blueberries for the best flavor and presentation.
- Don’t overmix the batter; mix until just combined for a light texture.
- Let the cake cool completely before frosting to prevent melting.
- Chill the cake before serving for a refreshing treat on warm days.
Equipment Needed
- 9×13-inch baking pan: Essential for baking the cake; a round pan works too if you prefer.
- Mixing bowls: Use at least two—one for wet ingredients and one for dry.
- Electric mixer: Makes creaming butter and sugar a breeze; a whisk works if you’re feeling strong!
- Spatula: Perfect for spreading whipped cream and scraping down the sides of bowls.
- Wire rack: Ideal for cooling the cake evenly; a plate can substitute in a pinch.
Variations
- Berry Medley: Swap out strawberries and blueberries for a mix of raspberries and blackberries for a unique twist.
- Gluten-Free Option: Use a gluten-free all-purpose flour blend to make this cake suitable for those with gluten sensitivities.
- Vegan Version: Replace eggs with flaxseed meal and use plant-based butter and milk for a delicious vegan treat.
- Citrus Zing: Add lemon or orange zest to the batter for a refreshing citrus flavor that complements the berries.
- Chocolate Lovers: Incorporate cocoa powder into the batter for a chocolate cake base, then top with whipped cream and berries.
Serving Suggestions
- Pair with Ice Cream: A scoop of vanilla or strawberry ice cream complements the cake perfectly.
- Fresh Mint: Garnish with fresh mint leaves for a pop of color and flavor.
- Festive Drinks: Serve with lemonade or iced tea for a refreshing beverage option.
- Presentation: Use a colorful platter to showcase the cake at your gathering.
FAQs about Easy Flag Cake
Can I make the Easy Flag Cake ahead of time?
Absolutely! You can bake the cake a day in advance. Just wait to add the whipped cream and fruit until the day you plan to serve it. This keeps everything fresh and vibrant.
What can I use instead of whipped cream?
If you’re looking for alternatives, consider using cream cheese frosting or a light yogurt topping. Both options add a delicious twist to your Easy Flag Cake.
How do I store leftovers?
Store any leftover cake in an airtight container in the refrigerator. It should stay fresh for about 3-4 days, but trust me, it won’t last that long!
Can I use frozen berries for the flag design?
While fresh berries are best for presentation, you can use frozen ones in a pinch. Just make sure to thaw and drain them well to avoid excess moisture on your cake.
Is this Easy Flag Cake suitable for kids?
Definitely! This cake is a hit with kids, thanks to its fun design and sweet flavors. Plus, it’s a great way to get them involved in the kitchen!
Final Thoughts
Creating the Easy Flag Cake is more than just baking; it’s about bringing people together. The joy of watching friends and family gather around a dessert that’s as beautiful as it is delicious is truly special. Each slice reveals a burst of flavor, and the vibrant colors spark conversations and smiles. Whether it’s a holiday celebration or a simple weekend gathering, this cake adds a festive touch to any occasion. So, roll up your sleeves, gather your ingredients, and let the magic of this Easy Flag Cake create sweet memories that will last long after the last bite!
Easy Flag Cake: Delight in This Simple Patriotic Dessert!
Ingredients
Method
- Preheat your oven to 350°F (175°C). Grease and flour a 9×13-inch baking pan.
- In a large mixing bowl, cream together the softened butter and sugar until light and fluffy.
- Add the eggs one at a time, mixing well after each addition. Stir in the vanilla extract.
- In a separate bowl, combine the flour, baking powder, and salt. Gradually add this dry mixture to the wet ingredients, alternating with the milk. Mix until just combined.
- Pour the batter into the prepared baking pan and spread it evenly.
- Bake for 30-35 minutes, or until a toothpick inserted in the center comes out clean. Allow the cake to cool completely in the pan on a wire rack.
- Once cooled, spread the whipped cream evenly over the top of the cake.
- Arrange the sliced strawberries in a rectangle in the top left corner to create the ‘flag’ design. Use the blueberries to fill in the remaining area of the flag.
- Chill the cake in the refrigerator for at least 30 minutes before serving to set the whipped cream.
Nutrition
Notes
- For a fun twist, try using raspberries instead of strawberries for a different flavor.
- You can also add a layer of lemon curd under the whipped cream for a zesty surprise.