
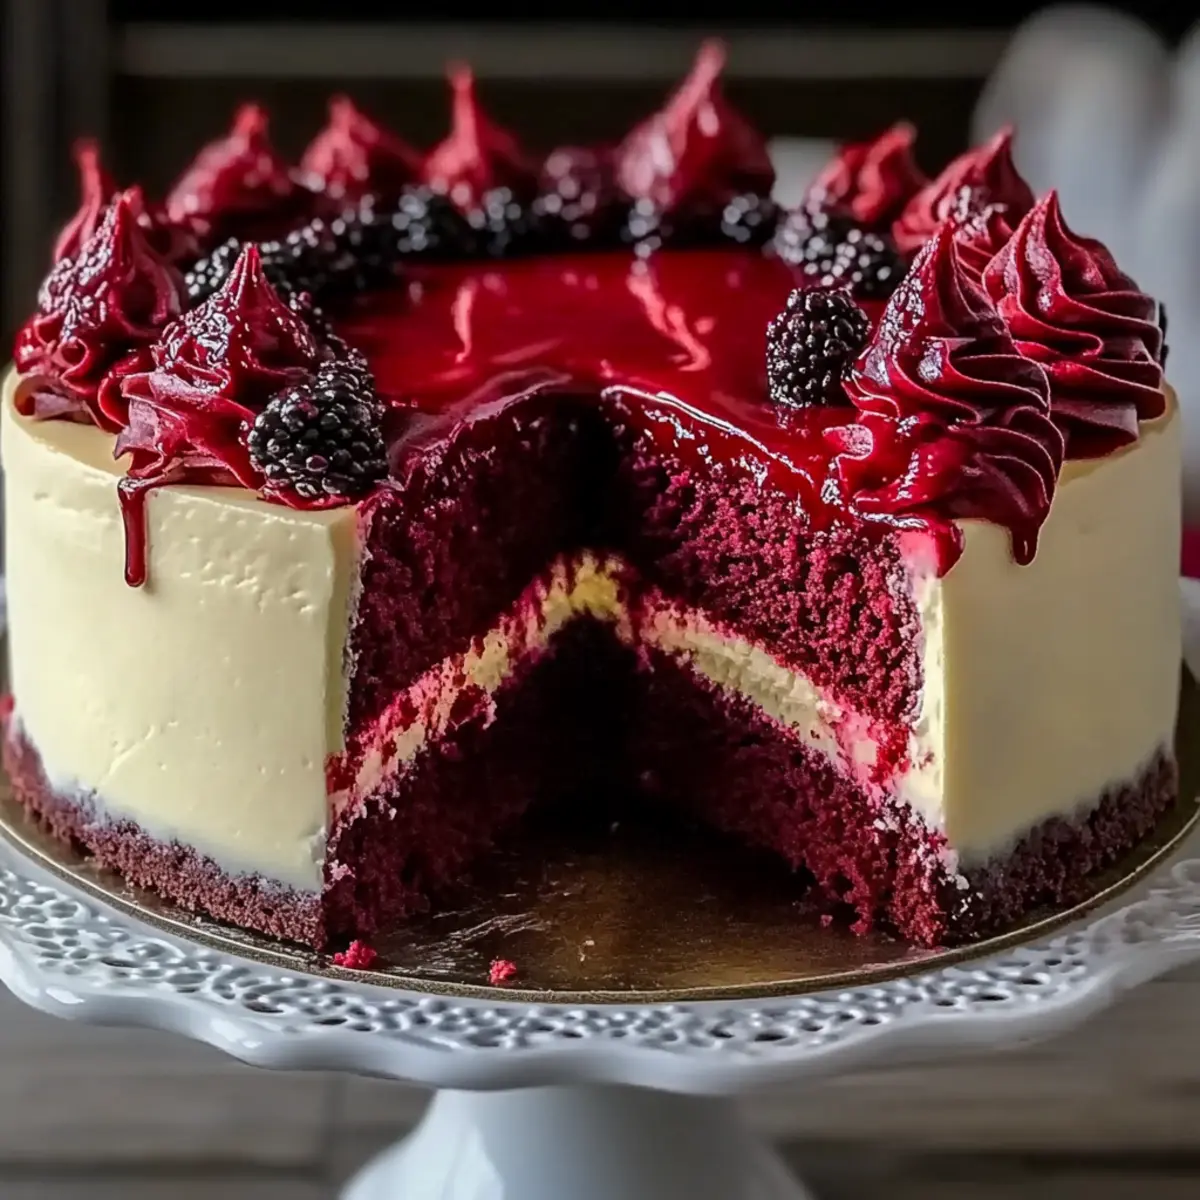
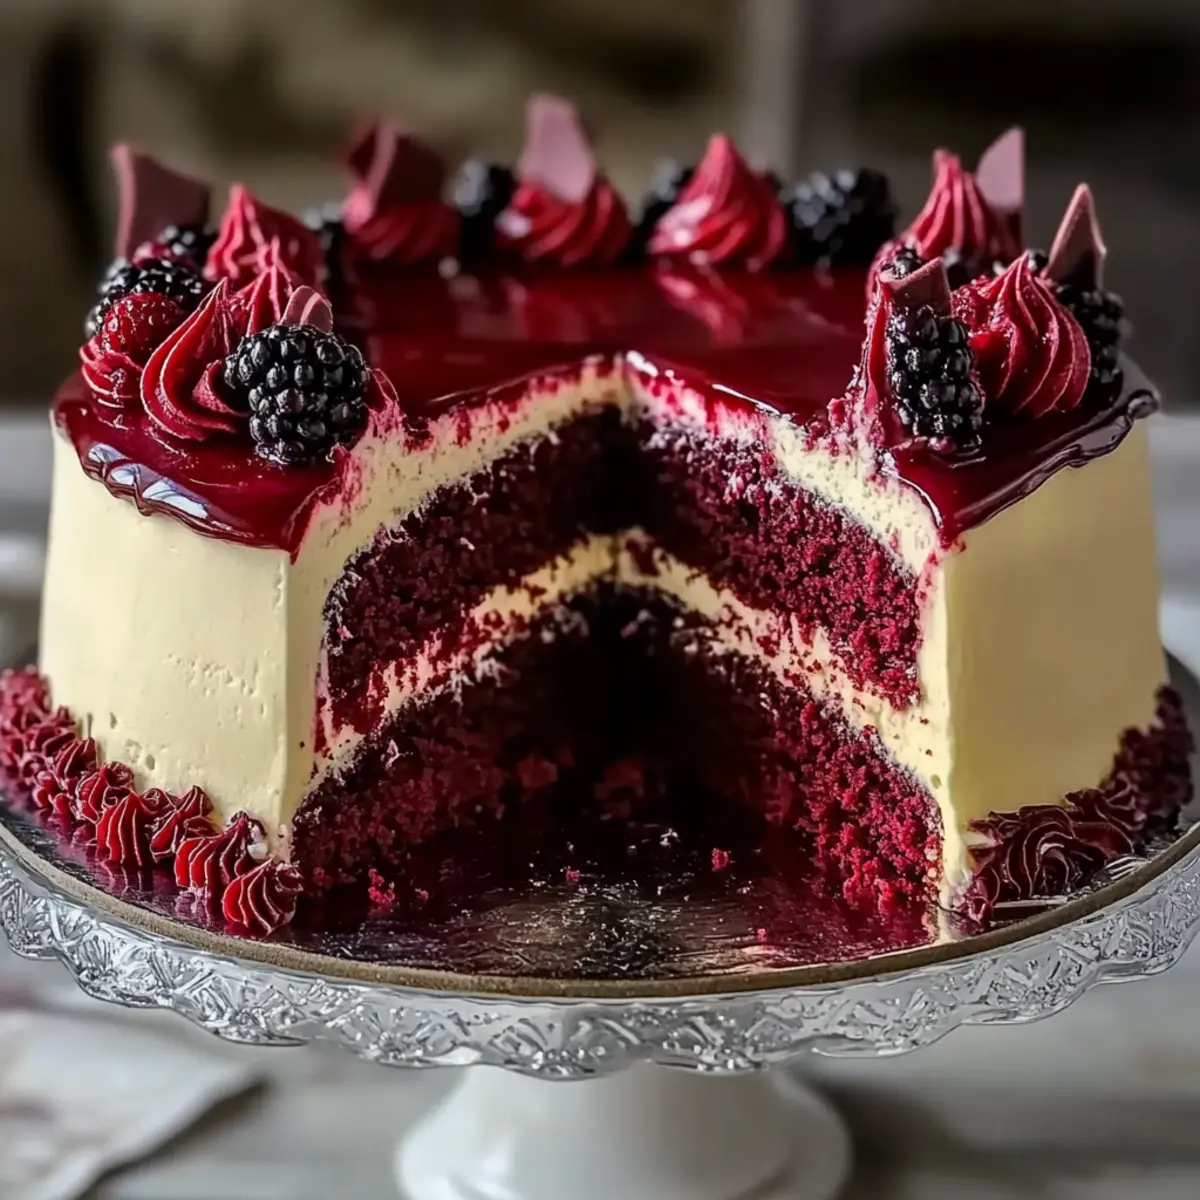
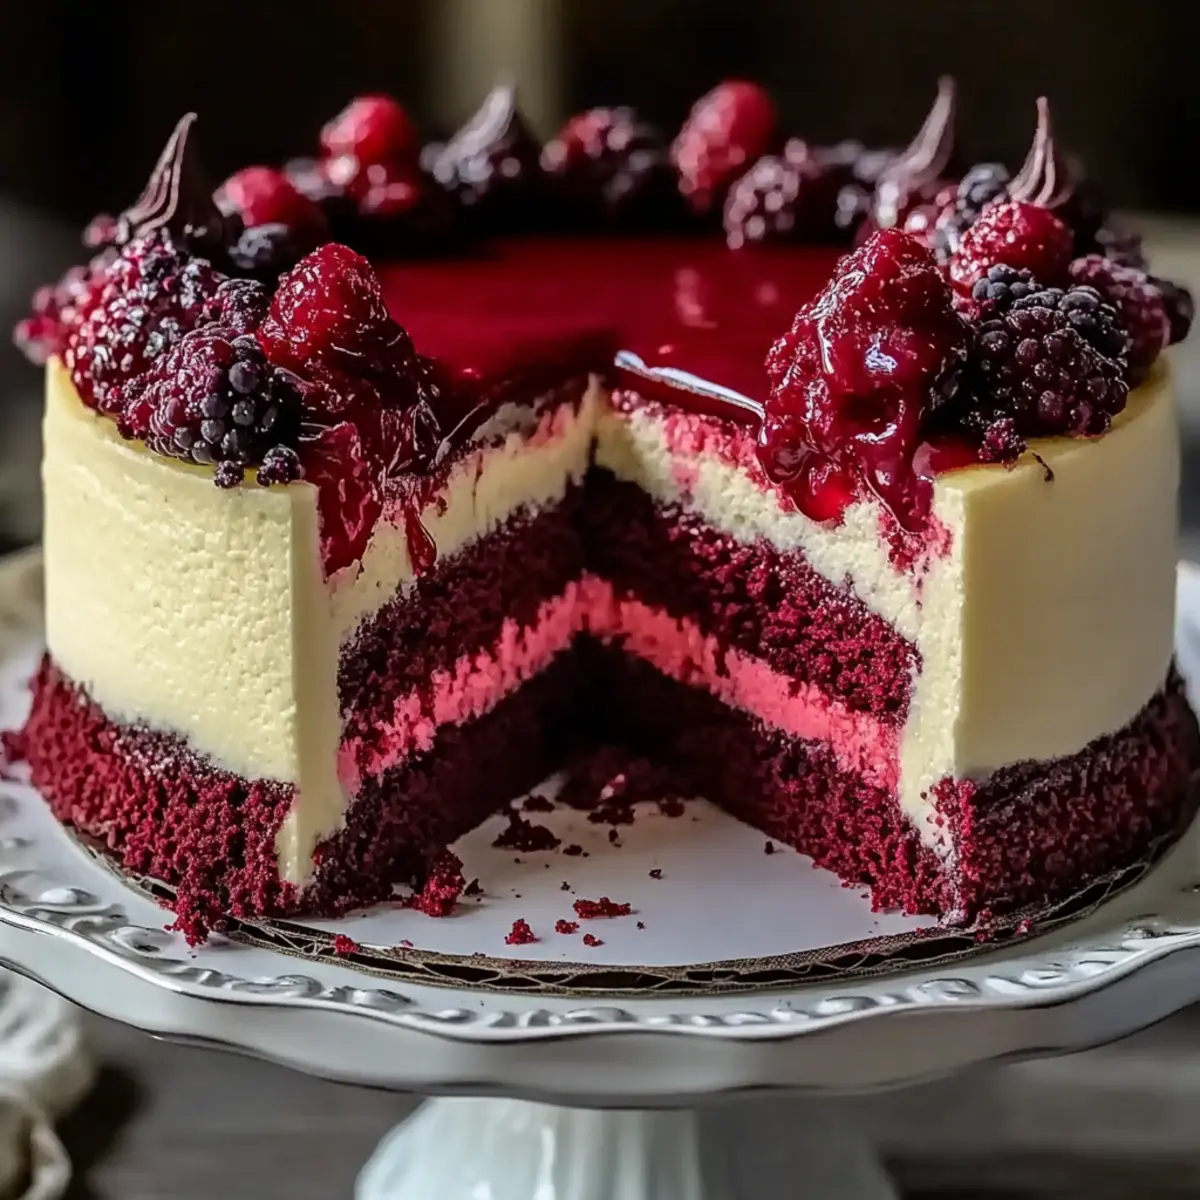
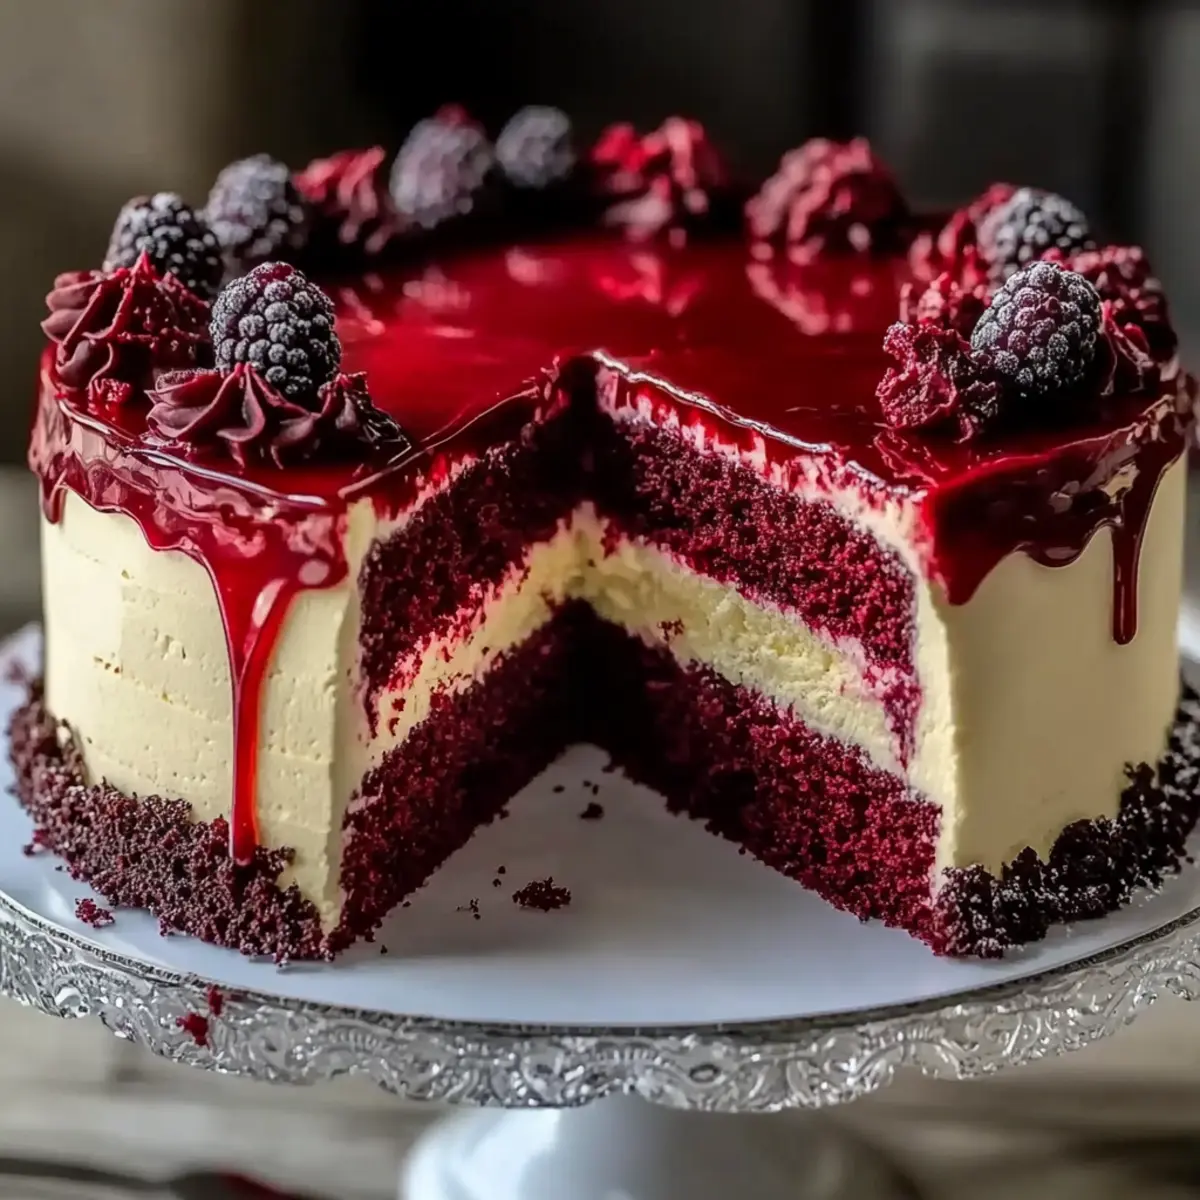
A vibrant splash of red caught my eye as I walked past the bakery, instantly reminding me of moments filled with laughter, celebrations, and sweet indulgences. That’s the essence of this Red Velvet Cheesecake Layer Cake, a show-stopping dessert that beautifully combines the moist, velvety layers of red velvet cake with the rich creaminess of cheesecake. It’s not just a feast for the eyes; this cake is also a stellar crowd-pleaser, guaranteed to elevate any festive occasion with its luscious flavors. Plus, it’s freezer-friendly, so you can savor those special moments long after your guests leave. Are you ready to whip up something extraordinary that will leave everyone asking for seconds?
Why is this cake a showstopper?
Decadent layers: The Red Velvet Cheesecake Layer Cake features stunning layers that not only look impressive but deliver a delicious play of flavors.
Perfect for celebrations: This cake is an ideal centerpiece for birthdays, anniversaries, or even just a cozy family gathering. It’s a guaranteed crowd-pleaser!
Easy to customize: Feel free to switch up flavors with variations like chocolate or espresso in the cheesecake layer.
Make-ahead friendly: You can prepare it in advance and freeze it, making it perfect for busy hosts who want to enjoy every moment with their guests.
Flavorful surprise: The vibrant berry glaze adds a fresh tang, making each bite exquisite. Serve it alongside a scoop of vanilla ice cream or some fresh berries for a delightful experience!
Dive into your own kitchen adventure and create your version today!
Red Velvet Cheesecake Layer Cake Ingredients
For the Crust
• Chocolate Cookie Crumbs – Adds a crunchy base for the cheesecake layer; substitute with graham cracker crumbs for a different flavor profile.
• Unsalted Butter – Helps bind the crust and adds richness; use coconut oil for a dairy-free option.
For the Cake Layers
• All-Purpose Flour – Provides structure to the cake layers; can replace with a gluten-free blend containing xanthan gum.
• Cocoa Powder – Contributes to the signature chocolate flavor and deep coloring; unsweetened cocoa is preferred for accurate flavor.
• Baking Soda & Baking Powder – Leavening agents that ensure the cake rises properly; both are necessary for optimal texture.
• Salt – Enhances flavor throughout the cake.
• Granulated Sugar – Sweetens both the cake and cheesecake layers; brown sugar can be substituted for a more caramel-like flavor.
• Vegetable Oil – Adds moisture to the cake; melted coconut oil can be used instead.
• Large Eggs – Essential for binding ingredients and providing structure; for a vegan version, use flax eggs.
• Buttermilk – Contributes tenderness and flavor to the cake; substitute with a mixture of milk and vinegar.
• Apple Cider Vinegar – Activates baking soda for better rise; can be replaced with lemon juice.
• Vanilla Extract – Adds depth of flavor; always opt for pure vanilla for the best taste.
• Red Gel Food Coloring – Ensures vibrant red color; gel version is preferred over liquid to avoid excess moisture.
For the Cheesecake Layer
• Cream Cheese – The base of the cheesecake layer providing a rich flavor and texture; can use heavy cream for a richer version.
• Powdered Sugar – Sweetens the cream cheese frosting and maintains a smooth consistency.
• Sour Cream – Enhances the creaminess of the cheesecake layer; plain yogurt can be used as a substitute.
For the Berry Glaze
• Strawberry or Raspberry Jam – Used for the glaze to add a fruity finish; can also use homemade compote.
• Lemon Juice & Water – Help in achieving the pourable glaze consistency; keep the ratios balanced for best results.
Gather these ingredients, and you’ll be well on your way to creating an unforgettable Red Velvet Cheesecake Layer Cake that will impress everyone at your next gathering!
Step‑by‑Step Instructions for Red Velvet Cheesecake Layer Cake
Step 1: Prepare the Crust
Start by preheating your oven to 350°F (175°C). In a medium bowl, combine chocolate cookie crumbs with melted unsalted butter until well mixed. Press this mixture firmly into the bottom of a springform pan, ensuring an even layer. Bake for 10 minutes until set, then remove from the oven and let cool completely while you prepare the cake.
Step 2: Make Red Velvet Cake Batter
In a large mixing bowl, whisk together the all-purpose flour, unsweetened cocoa powder, baking soda, baking powder, and salt. In another bowl, mix granulated sugar, vegetable oil, large eggs, buttermilk, apple cider vinegar, vanilla extract, and red gel food coloring until well combined. Gradually fold the dry ingredients into the wet mixture, being careful not to overmix, which ensures a light and fluffy Red Velvet Cheesecake Layer Cake.
Step 3: Bake Cake Layers
Divide the prepared cake batter equally between two greased 9-inch round cake pans. Place them in the preheated oven and bake for 25-30 minutes, or until a toothpick inserted into the center comes out clean. Once baked, remove the layers from the oven and let them cool in the pans for 10 minutes before transferring to wire racks to cool completely.
Step 4: Prepare the Cheesecake Layer
While the cake layers cool, beat the cream cheese in a large bowl until smooth and creamy. Gradually add powdered sugar, followed by eggs one at a time, mixing thoroughly after each addition to maintain a smooth texture. Lastly, fold in sour cream and vanilla extract. Pour the cheesecake mixture over the cooled crust in the springform pan and bake at 325°F (160°C) for 40-45 minutes until the center is slightly jiggly but not liquid.
Step 5: Assemble the Cake
Once the cheesecake has cooled and set, begin layering your Red Velvet Cheesecake Layer Cake. Place one red velvet cake layer on a serving plate, spread a generous layer of cream cheese frosting on top, and carefully set the cheesecake layer over it. Add the second red velvet cake layer on top and frost the entirety of the cake, creating an even, smooth layer of frosting around the edges.
Step 6: Add the Berry Glaze
To make the berry glaze, combine strawberry or raspberry jam with water and lemon juice in a small saucepan over low heat until warm and pourable. Stir well to achieve a smooth consistency. Pour the glaze over the top of the assembled cake, allowing it to gently drip down the sides, creating a stunning presentation for your beautiful Red Velvet Cheesecake Layer Cake.
Red Velvet Cheesecake Layer Cake Variations
Feel free to get creative and tailor this delightful cake to your taste buds!
-
Gluten-Free: Use a gluten-free flour blend instead of all-purpose flour to make a lighter version that everyone can enjoy.
-
Dairy-Free: Swap out cream cheese for a dairy-free cream cheese alternative and coconut yogurt in place of sour cream for a creamy treat without dairy.
-
Chocolate Lovers: Enhance the cheesecake layer with a swirl of melted dark chocolate to add another dimension of flavor. Each bite will be a chocolatey delight.
-
Espresso Infusion: Add a tablespoon of espresso powder to the cheesecake layer for a mocha-flavored twist that pairs beautifully with the velvet cake. This adds a sophisticated richness.
-
Berry Burst: Fold in fresh raspberries or blueberries into the cheesecake mixture for a fruity surprise that complements the rich flavors. This extra layer of flavor and juiciness will be a hit!
-
Decadent Frosting: Instead of cream cheese frosting, try fluffy whipped cream or a chocolate ganache for a different treat that will keep the cake indulgent.
-
Mini Delights: Create mini cheesecakes in mason jars or as cupcakes for perfect individual servings, making them great for gatherings like picnics or parties.
-
Festive Touch: Decorate with seasonal fruits or edible flowers to turn your cake into a stunning centerpiece for any celebration, like the updated look of our Strawberry Shortcake Cake for more ideas!
Switching things up can turn this classic dessert into a showstopper that reflects your personal style. Enjoy the process and the delicious results!
Tips for the Best Red Velvet Cheesecake Layer Cake
-
Room Temperature Ingredients: Ensure all ingredients are at room temperature before starting. This allows for better mixing and a fluffier texture in your Red Velvet Cheesecake Layer Cake.
-
Avoid Overmixing: Be cautious not to overbeat the cake batter. Overmixing can lead to a dense texture instead of the light and airy cake you want.
-
Cheesecake Precautions: Allow the cheesecake to jiggle slightly in the center before cooling. This prevents cracking and keeps the cheesecake creamy.
-
Chilling Time: For optimal flavor and texture, serve your cake chilled. Allow it to sit at room temperature for 15-20 minutes before slicing for a softer frosting experience.
-
Berry Glaze Tips: Warm the berry glaze gently to ensure it’s pourable. This creates a beautiful finish and helps it drizzle down the sides flawlessly.
Make Ahead Options
These Red Velvet Cheesecake Layer Cake preparations make your meal planning a breeze! You can easily prepare the cheesecake layer and store it in the refrigerator for up to 3 days; just cover it tightly to maintain its creamy texture. Additionally, the cake layers can be baked a day ahead and kept wrapped in plastic in the fridge for up to 24 hours. For the crust, bake and cool it in advance, too, but be sure to refrigerate it to retain its crunch. When you’re ready to assemble, simply layer the cooled red velvet cakes with the cheesecake and frosting, then finish with the berry glaze right before serving for a decadent treat that tastes just as divine as when freshly made!
How to Store and Freeze Red Velvet Cheesecake Layer Cake
Fridge: Store in an airtight container for up to 4-5 days to maintain freshness. This keeps the luscious layers creamy and delightful.
Freezer: Wrap tightly in plastic wrap and then in aluminum foil to prevent freezer burn. It can be frozen for up to 3 months; thaw overnight in the refrigerator before serving.
Reheating: If desired, let the cake sit at room temperature for about 30 minutes to bring out the flavors before enjoying its creamy decadence.
Serving Suggestions: Pair with fresh berries or a scoop of vanilla ice cream to enhance the experience of this stunning Red Velvet Cheesecake Layer Cake.
What to Serve with Red Velvet Cheesecake Layer Cake
The delightful richness of this cake pairs beautifully with a variety of flavors and textures, making it a perfect centerpiece for any gathering.
-
Creamy Vanilla Ice Cream: A scoop of indulgent vanilla ice cream adds a refreshing contrast, helping to balance the cake’s richness.
-
Fresh Berry Salad: A medley of strawberries, blueberries, and raspberries provides a tart freshness that cuts through the sweetness of the layers.
-
Chocolate Chip Cookies: The chewy texture of classic cookies complements the soft, velvety cake while enhancing the dessert experience, creating a memorable bite.
-
Espresso or Coffee: A warm cup of coffee enhances the flavors of the cake, perfect for those who love to indulge in a sweet treat alongside a warm drink.
-
Light Whipped Cream: A dollop of lightly sweetened whipped cream adds a lightness and airy touch that harmonizes beautifully with the velvety cheesecake.
-
Sparkling Water with Lime: The effervescence of sparkling water, with a hint of lime, refreshes your palate and is a delightful non-alcoholic option for lively gatherings.
Elevate your celebration by pairing these delights with your Red Velvet Cheesecake Layer Cake, ensuring every bite remains an unforgettable experience!
Red Velvet Cheesecake Layer Cake Recipe FAQs
How do I select the right red velvet cake ingredients?
Absolutely! For the best Red Velvet Cheesecake Layer Cake, ensure your buttermilk is fresh and your flour is not past its expiration date. Look for unsweetened cocoa powder for accurate flavor; too much sugar can throw off the cake’s balance. Additionally, check that your red gel food coloring is vibrant and not expired to achieve that stunning hue.
How should I store leftovers?
Very good question! Store your cake in an airtight container in the refrigerator for up to 4-5 days. This keeps the layers moist and the flavors fresh. If you’d like to enjoy it later, freezing is a great option, too.
Can I freeze the Red Velvet Cheesecake Layer Cake?
Definitely! Wrap the cake tightly in plastic wrap, followed by aluminum foil to prevent freezer burn, and it will stay fresh for up to 3 months. When you’re ready to indulge, let it thaw overnight in the refrigerator before serving to enjoy its creamy decadence, and remember to let it come to room temperature for the best flavor experience.
What if my cheesecake cracks while baking?
Oh, that can happen sometimes! To prevent cracks, try not to overbeat the cheesecake mixture. Also, bake it in a water bath if you have the time—you simply place the springform pan in a larger pan filled with water during baking. This helps maintain humidity, reducing the chance of cracks. Lastly, allow the cheesecake to have a slight jiggle in the center before cooling; this indicates it’s perfectly baked.
Are there any dietary considerations I should keep in mind?
Yes! If you’re accommodating allergies, you can easily make this dessert gluten-free by using a specific blend of gluten-free flour that includes xanthan gum. For those avoiding dairy, substituting coconut oil for butter and using a dairy-free cream cheese alternative will still create a delicious cake. Always check for food safety around shared kitchen spaces if you’re serving this to others.
What are some toppings I can use besides berry glaze?
The more the merrier! Aside from the berry glaze, you can drizzle chocolate ganache on top or use whipped cream for a light alternative. Fresh fruit slices or sprigs of mint can also enhance the visual appeal and freshness of each slice!
Irresistibly Creamy Red Velvet Cheesecake Layer Cake Recipe
Ingredients
Equipment
Method
- Preheat the oven to 350°F (175°C). In a medium bowl, combine chocolate cookie crumbs with melted unsalted butter until well mixed. Press this mixture firmly into the bottom of a springform pan, and bake for 10 minutes until set. Let cool completely.
- In a large mixing bowl, whisk together the all-purpose flour, cocoa powder, baking soda, baking powder, and salt. In another bowl, mix granulated sugar, vegetable oil, eggs, buttermilk, apple cider vinegar, vanilla extract, and red gel food coloring until well combined. Gradually fold the dry ingredients into the wet mixture.
- Divide the prepared cake batter equally between two greased 9-inch round cake pans. Bake for 25-30 minutes, or until a toothpick inserted into the center comes out clean. Let them cool in the pans for 10 minutes before transferring to wire racks to cool completely.
- While the cake layers cool, beat the cream cheese until smooth. Gradually add the powdered sugar, followed by eggs one at a time. Fold in sour cream and vanilla extract. Pour this mixture over the cooled crust and bake at 325°F (160°C) for 40-45 minutes.
- Once the cheesecake has cooled and set, layer your cake starting with one red velvet layer, adding cream cheese frosting, then the cheesecake layer, followed by the second red velvet layer. Frost the entirety of the cake.
- Combine jam, water, and lemon juice in a small saucepan over low heat until warm and pourable. Stir to achieve a smooth consistency and pour over the top of the assembled cake.